Introducing Gram 👋
Gram is the fastest way to build a production-ready MCP server.
It is a platform that enables any company to create, curate and host agentic tools for your APIs.
Why MCP Matters
Section titled “Why MCP Matters”Agents mainly interact with APIs through the Model Context Protocol (MCP). Since it was announced by Anthropic in November 2024, MCP has seen an unprecedented rate of adoption, quickly becoming the de facto standard. Companies like Microsoft, Google, OpenAI, and Cloudflare (among many others) have embraced it and offer MCP servers as a new way to interact with their existing APIs.
But creating, deploying, hosting, and managing MCP servers remains confusing and challenging. Although MCP follows a familiar client-server model, it creates confusion about who should build, own, manage, and maintain the server. With APIs, it’s always been clear. The producer (like Stripe) hosts the API, and the consumer (for example, an online shop) uses that API. With MCP, hosting models vary: Developers often “host” MCP servers on their own machines, or companies host them internally for team-wide access to third-party integrations.
We think that companies will naturally gravitate to hosting and managing their own MCP servers, and we built Gram to make that easy.
Why Gram?
Section titled “Why Gram?”To unlock the value of MCP companies need to be able to leverage existing APIs and products capabilities. Gram is aimed to give you a comprehensive experience around MCP without the need to learn a new language or framework. APIs alone are often not enough to build high quality tools but they can be a great starting point to build on.
To realise this vision Gram is built with the following principles:
🔹 Simplicity: Easy to use, easy to understand, easy to maintain.
🔹 Performant: Fast infrastructure that you can rely on.
🔹 Secure: Built in security and best practices for working with agentic tools.
🔹 Works with your stack: Helps you leverage existing APIs to bootstrap tools.
Gram is made with love ❤️ and ⚒️ by the team at Speakeasy.
Create and curate tools with ease
Section titled “Create and curate tools with ease”A great MCP server is not a 1:1 mapping to your REST API.
Existing REST APIs are a starting point, but to create a functional MCP server, you need to perform additional steps:
- Scope tools - Presented with the list of all the operations in an API, LLMs struggle to choose the right tool to accomplish a job. This is due to their limited context window. To improve performance, scope the API operations to only include the most relevant ones. Less is more when it comes to MCP. Gram gives you the ability to create toolsets to scope and slice up your API specs.
- Add Context - A user reading an API reference is coming in with some implicit context about the relevant business domain. The same is not true of an LLM examining a list of tools on an MCP server. It is up to the MCP server maintainer to make sure the server provides the LLM with the context it needs. Adding rich tool descriptions, prompts, and examples, greatly improves the performance of the MCP server. Focus on the when and why of the tool. Gram gives you the ability to add additional context to your tools.
- Define Custom Tools - REST APIs are resource-oriented: create a company, update the contact field, etc. MCP servers work best when they’re workflow-based: “summarize recent channel activity”. Gram gives you the ability to distribute custom tools that wrap multiple API endpoints and additional steps as a single tool.
Gram makes tool creation & curation easy. Tools are bootstrapped by pulling API paths, input schemas, security schemes, and descriptions out of OpenAPI documents. Once an API is uploaded to the Gram platform the day 0 workflow looks like this:
- Remove unnecessary tools from your toolset
- Combine tools into use case specific toolsets.
- Fine-tune individual tools with better descriptions and custom prompts
- Create custom toolsets to map a workflow
- Test and iterate on tools in the LLM playground
All the changes made to a toolset are reflected in a MCP server instantly.
Going live: Distributing MCP servers
Section titled “Going live: Distributing MCP servers”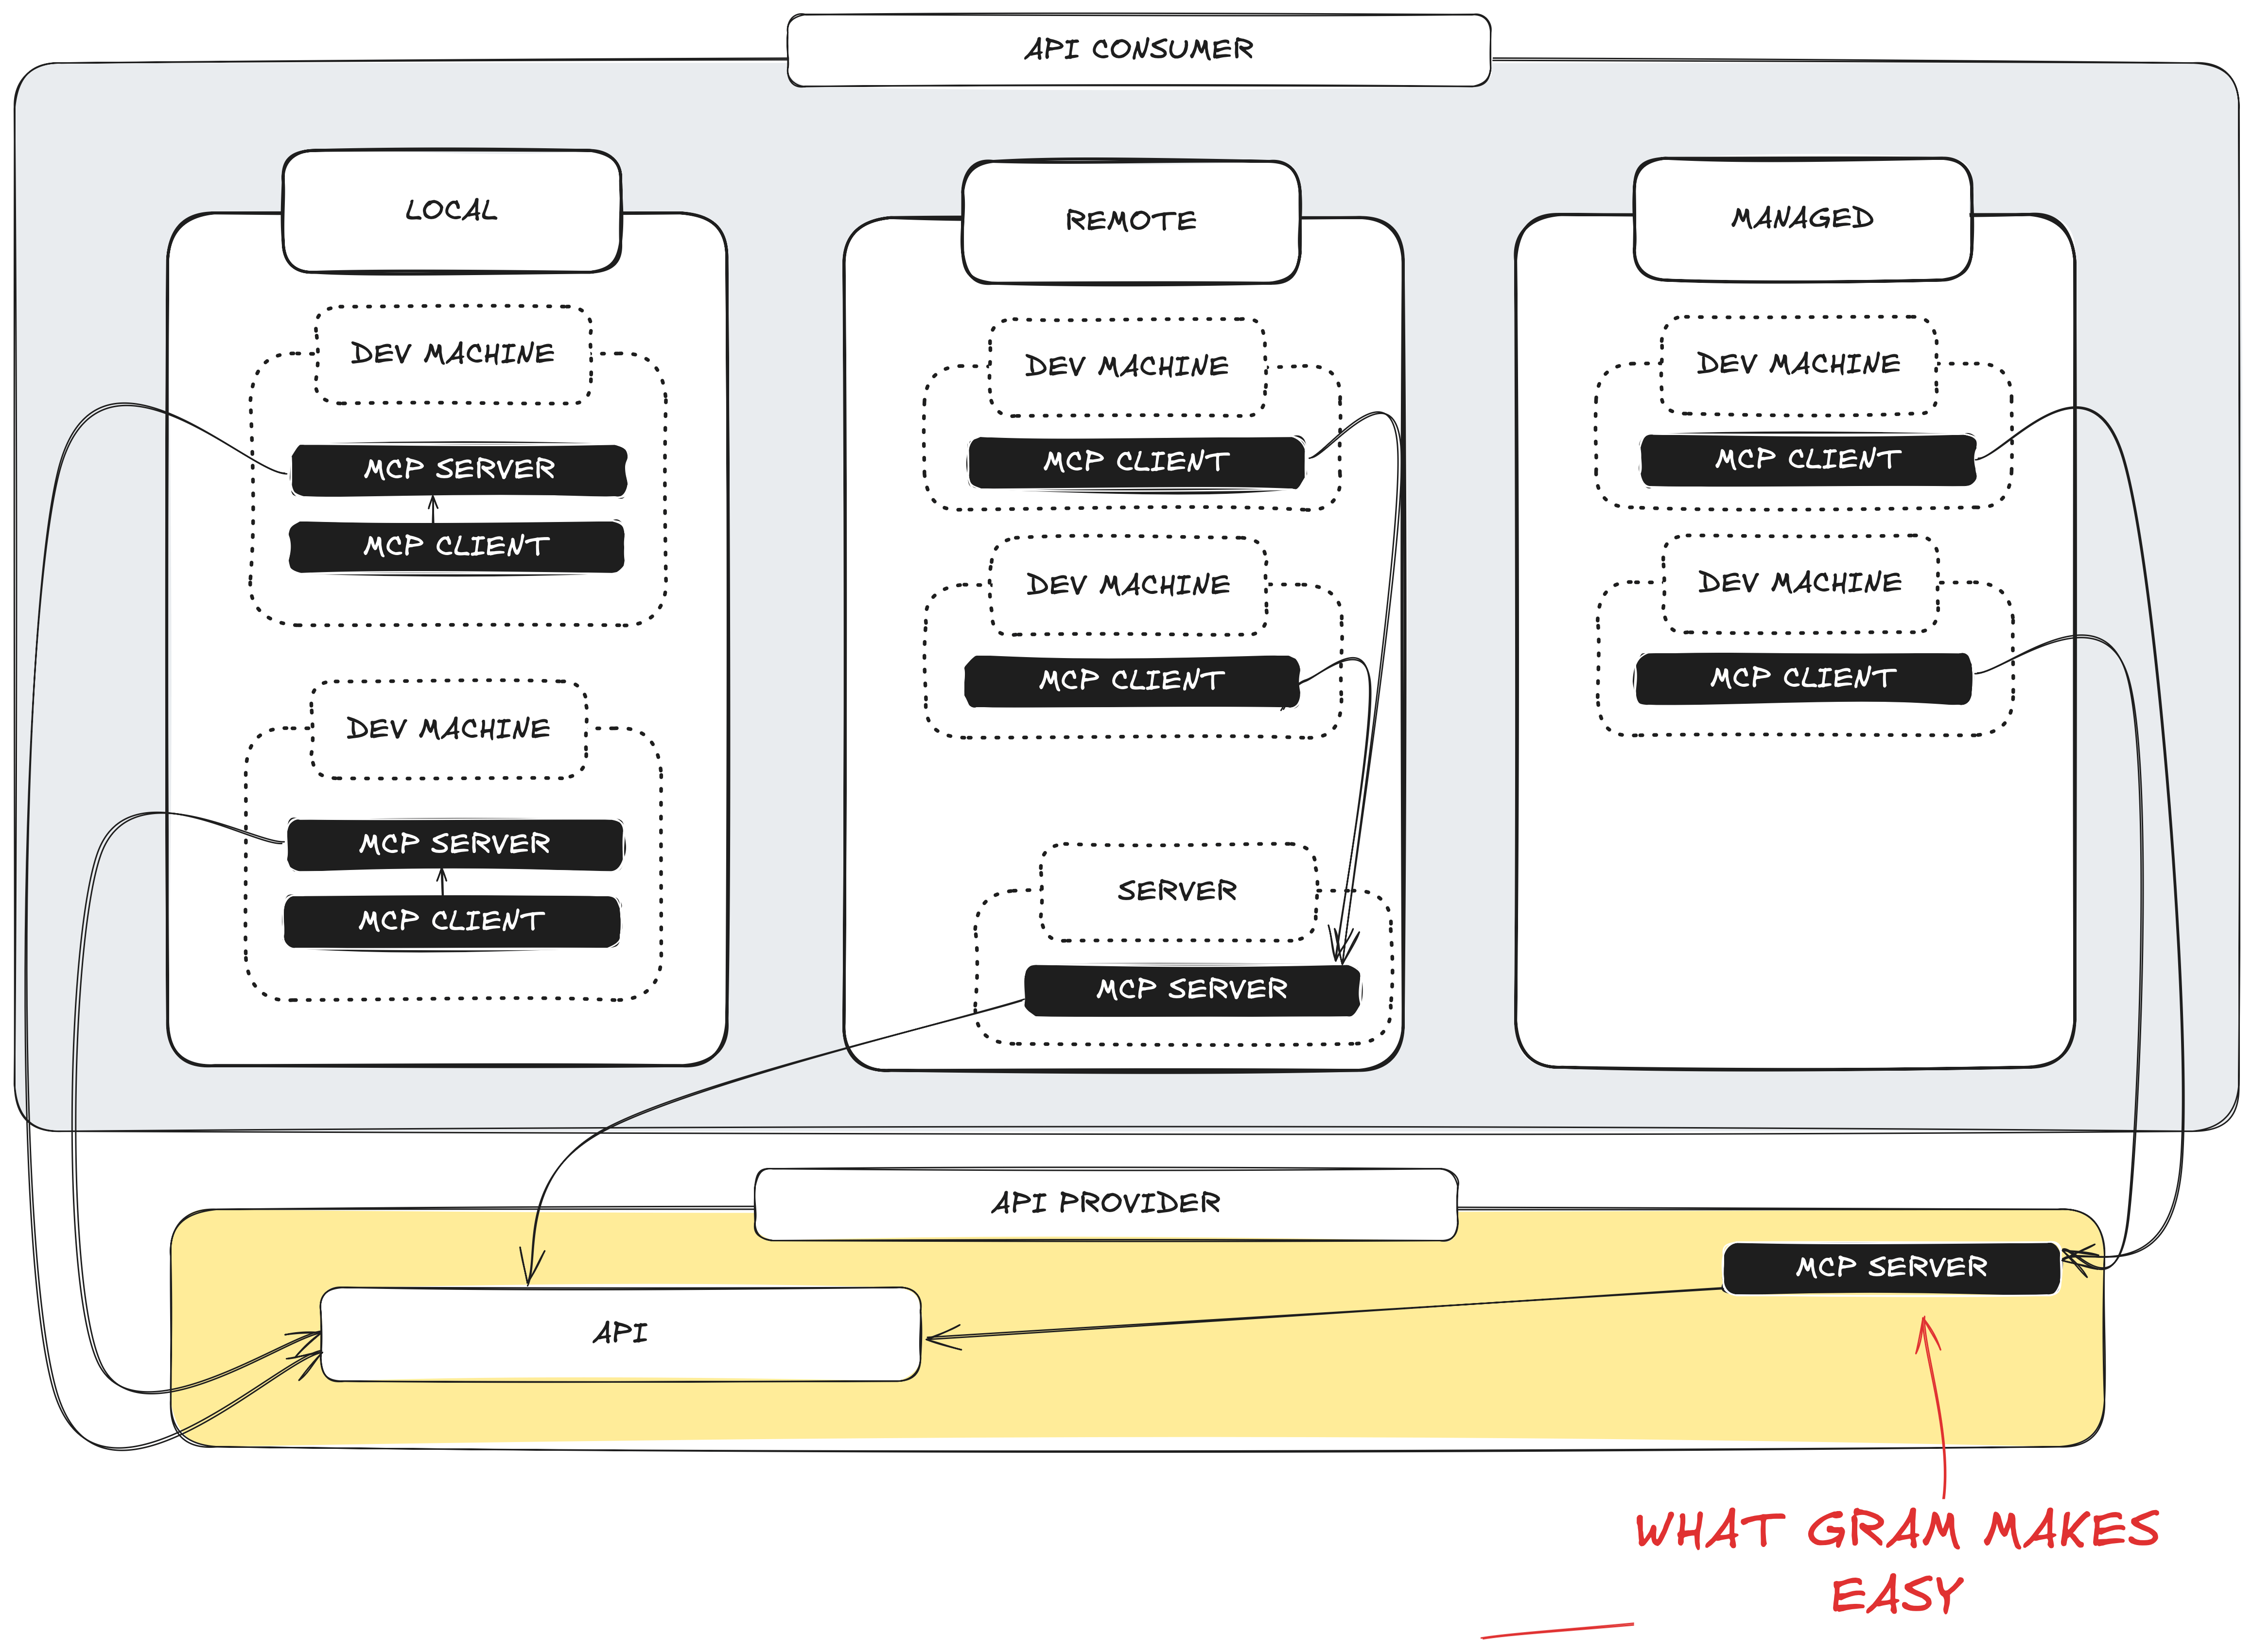
People use MCP in various ways, broadly categorized as follows:
- Local: A developer downloads an MCP server to their developer machine, and configures an MCP client, like Claude or Cursor, to use the tools provided in that server.
- Remote: A system administrator downloads an MCP server to a company-accessible server. Anyone at the company can configure their MCP client to interact with a company-accessible tool via this server.
- Managed: The API producer hosts and manages the MCP server, allowing any of its customers to configure their MCP clients to connect to the server and use the API.
Currently, MCP servers are mostly local (hosted by API consumers), which creates friction through replicated setup work and lack of centralized control. We believe the industry will evolve toward Managed MCP servers, where API producers handle hosting, security, and enterprise features.
Gram’s managed hosting approach
Section titled “Gram’s managed hosting approach”Once tools have been curated, the MCP server is ready to deploy. Every toolset automatically comes with an MCP server hosted at a Gram managed URL. Custom domains can be linked to create a branded, 1st party MCP server at mcp.{{your-domain}}.com/{{server-name}}
Gram provides completely managed hosting of MCP servers or self-hosted.
LLM-Friendly Docs
Section titled “LLM-Friendly Docs”This documentation site is also available in llms.txt format, which is a simple markdown standard that LLMs can consume easily.
The llms.txt references two ways to access the LLM-friendly documentation:
llms-small.txtis an abridged developer documentation for the site.llms-full.txtcontains the entire documentation. Note this may exceed the context window of your LLM.
In addition, any page can be accessed as markdown by appending .md to the URL. For example, this page would become https://docs.getgram.ai/introduction.md , which you can view here.
Finally, you can copy the contents of any page as markdown by pressing “Cmd+C” (or “Ctrl+C” on Windows) on your keyboard.