Add AI chat to an existing app with MCP and Gram
If you have any kind of SaaS application, you’re probably used to your users using it via a frontend. But now, instead of clicking through filters and forms, they want to just ask an AI agent for what they need. For example:
- Show me all tasks assigned to Sarah that are due this week.- How many users visited my blog last week?- Find me the top three candidates who applied yesterdayThis guide shows you how to add a chat interface to an existing application. You can give your users natural language interaction, while your current backend, security model, and business logic remain unchanged.
We’ll use this TaskBoard app as a demo. The main branch contains the starting app, and the completed-ai-chat branch contains the final result with chat functionality.
This guide will show you how to use Gram to create an MCP server that works with your existing API. We’ll also create a basic chat modal to interact with that MCP server via OpenAI.
An overview of the TaskBoard project
Section titled “An overview of the TaskBoard project”The starting task management app is structured like this:
TaskBoard/├── taskboard/ # Existing Next.js app│ ├── src/│ │ ├── app/api/ # CRUD API routes│ │ │ ├── items/ # Task CRUD operations│ │ │ ├── login/ # User authentication│ │ │ └── register/ # User registration│ │ ├── components/ # React components│ │ └── lib/ # Database and auth helpers│ └── prisma/ # SQLite database└── docker-compose.yml # Container setupThe app interface before adding chat:
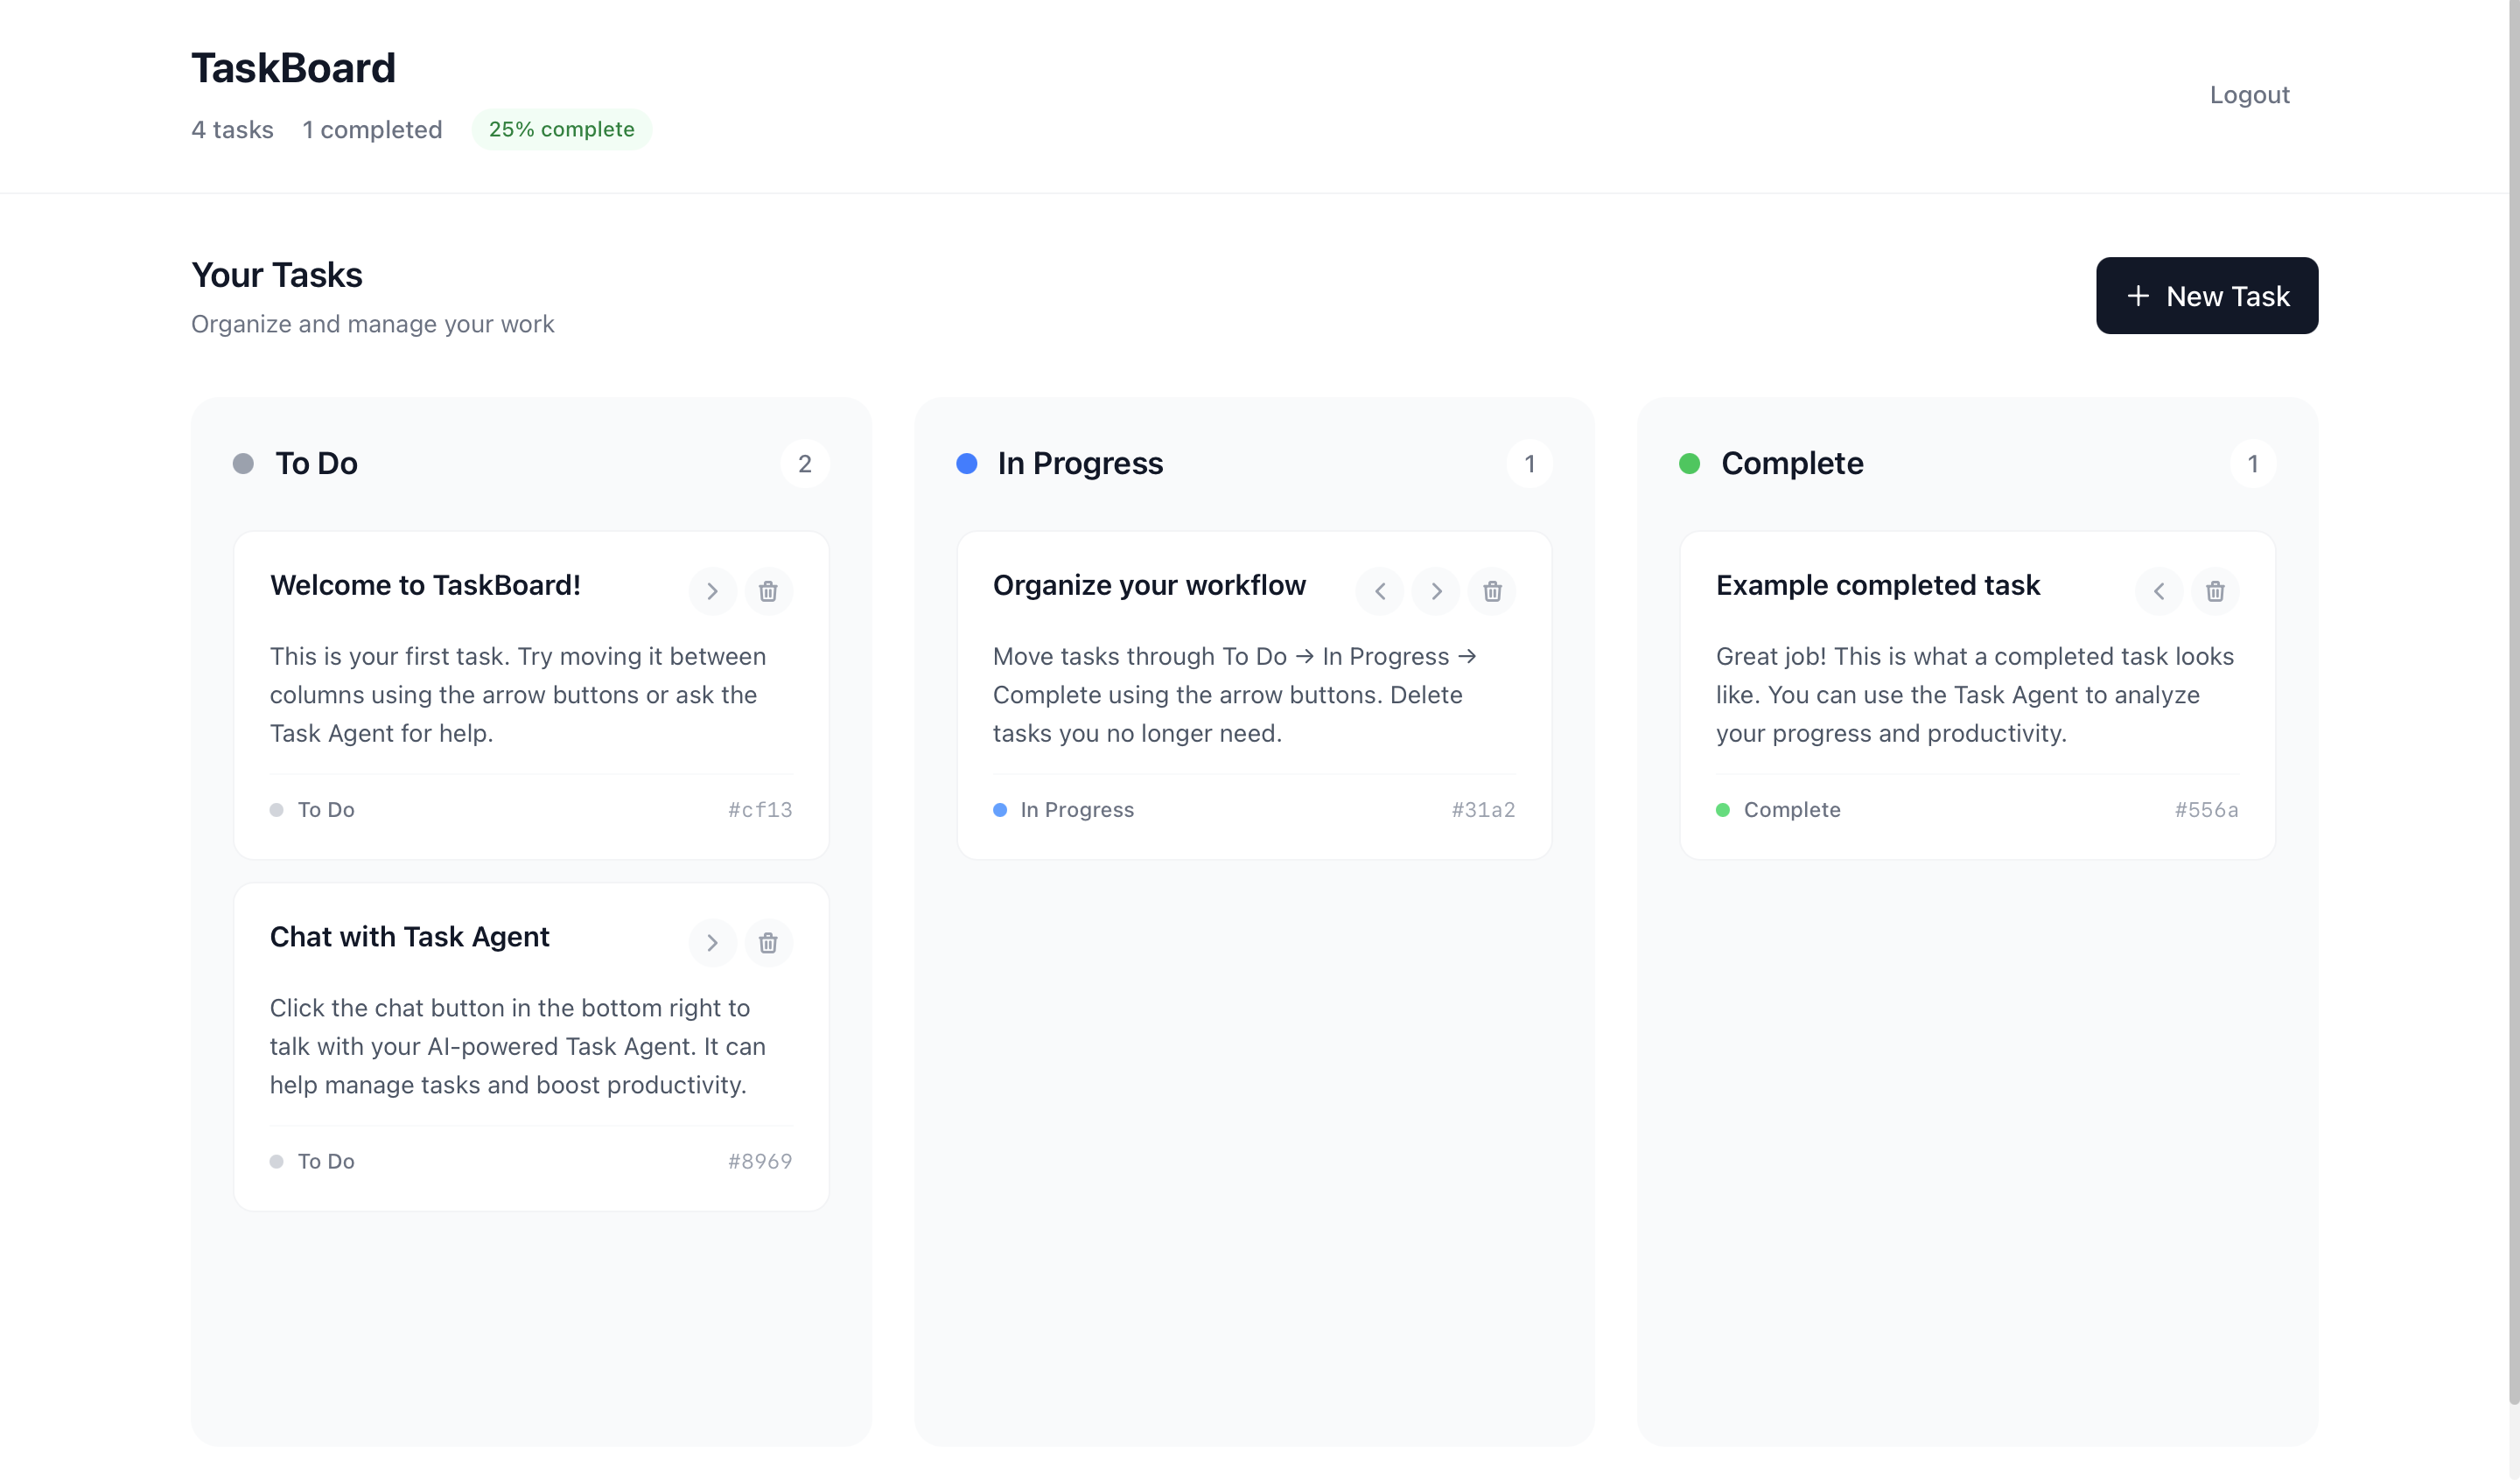
Users interact with the app by clicking, typing, and moving tasks.
The app works, but we want users to be able to chat with their tasks.
Overview of the TaskBoard project with added chat
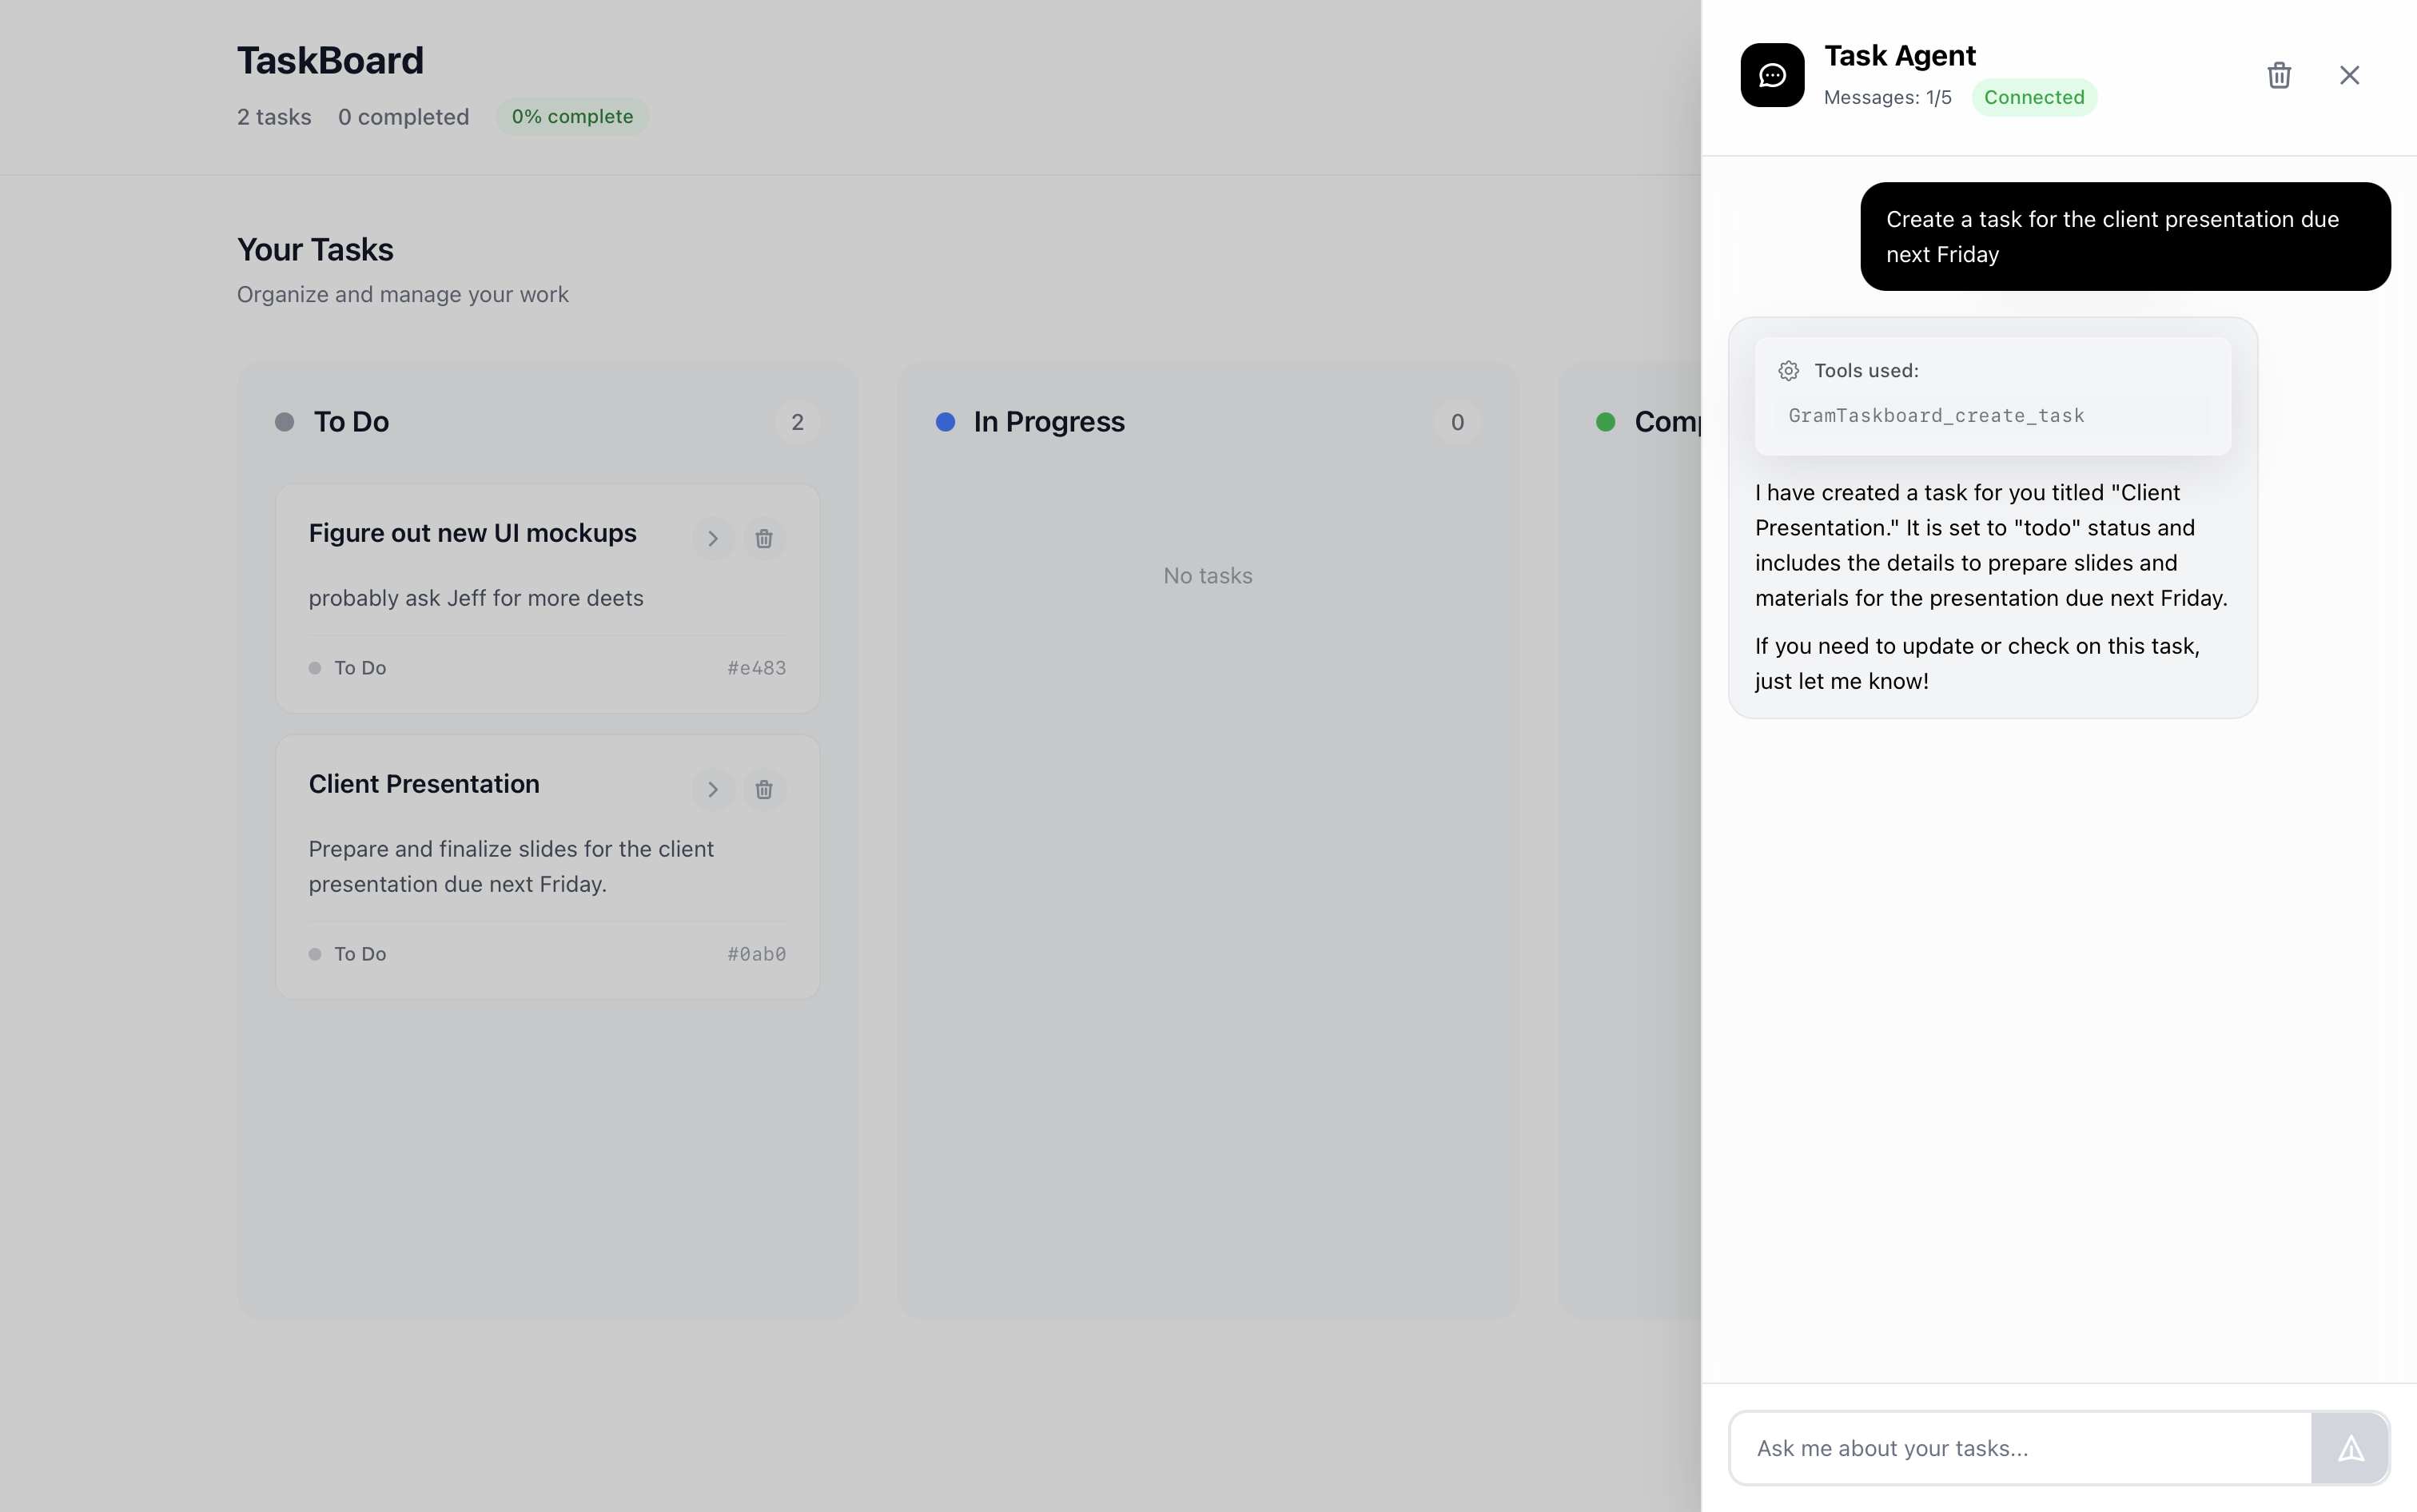
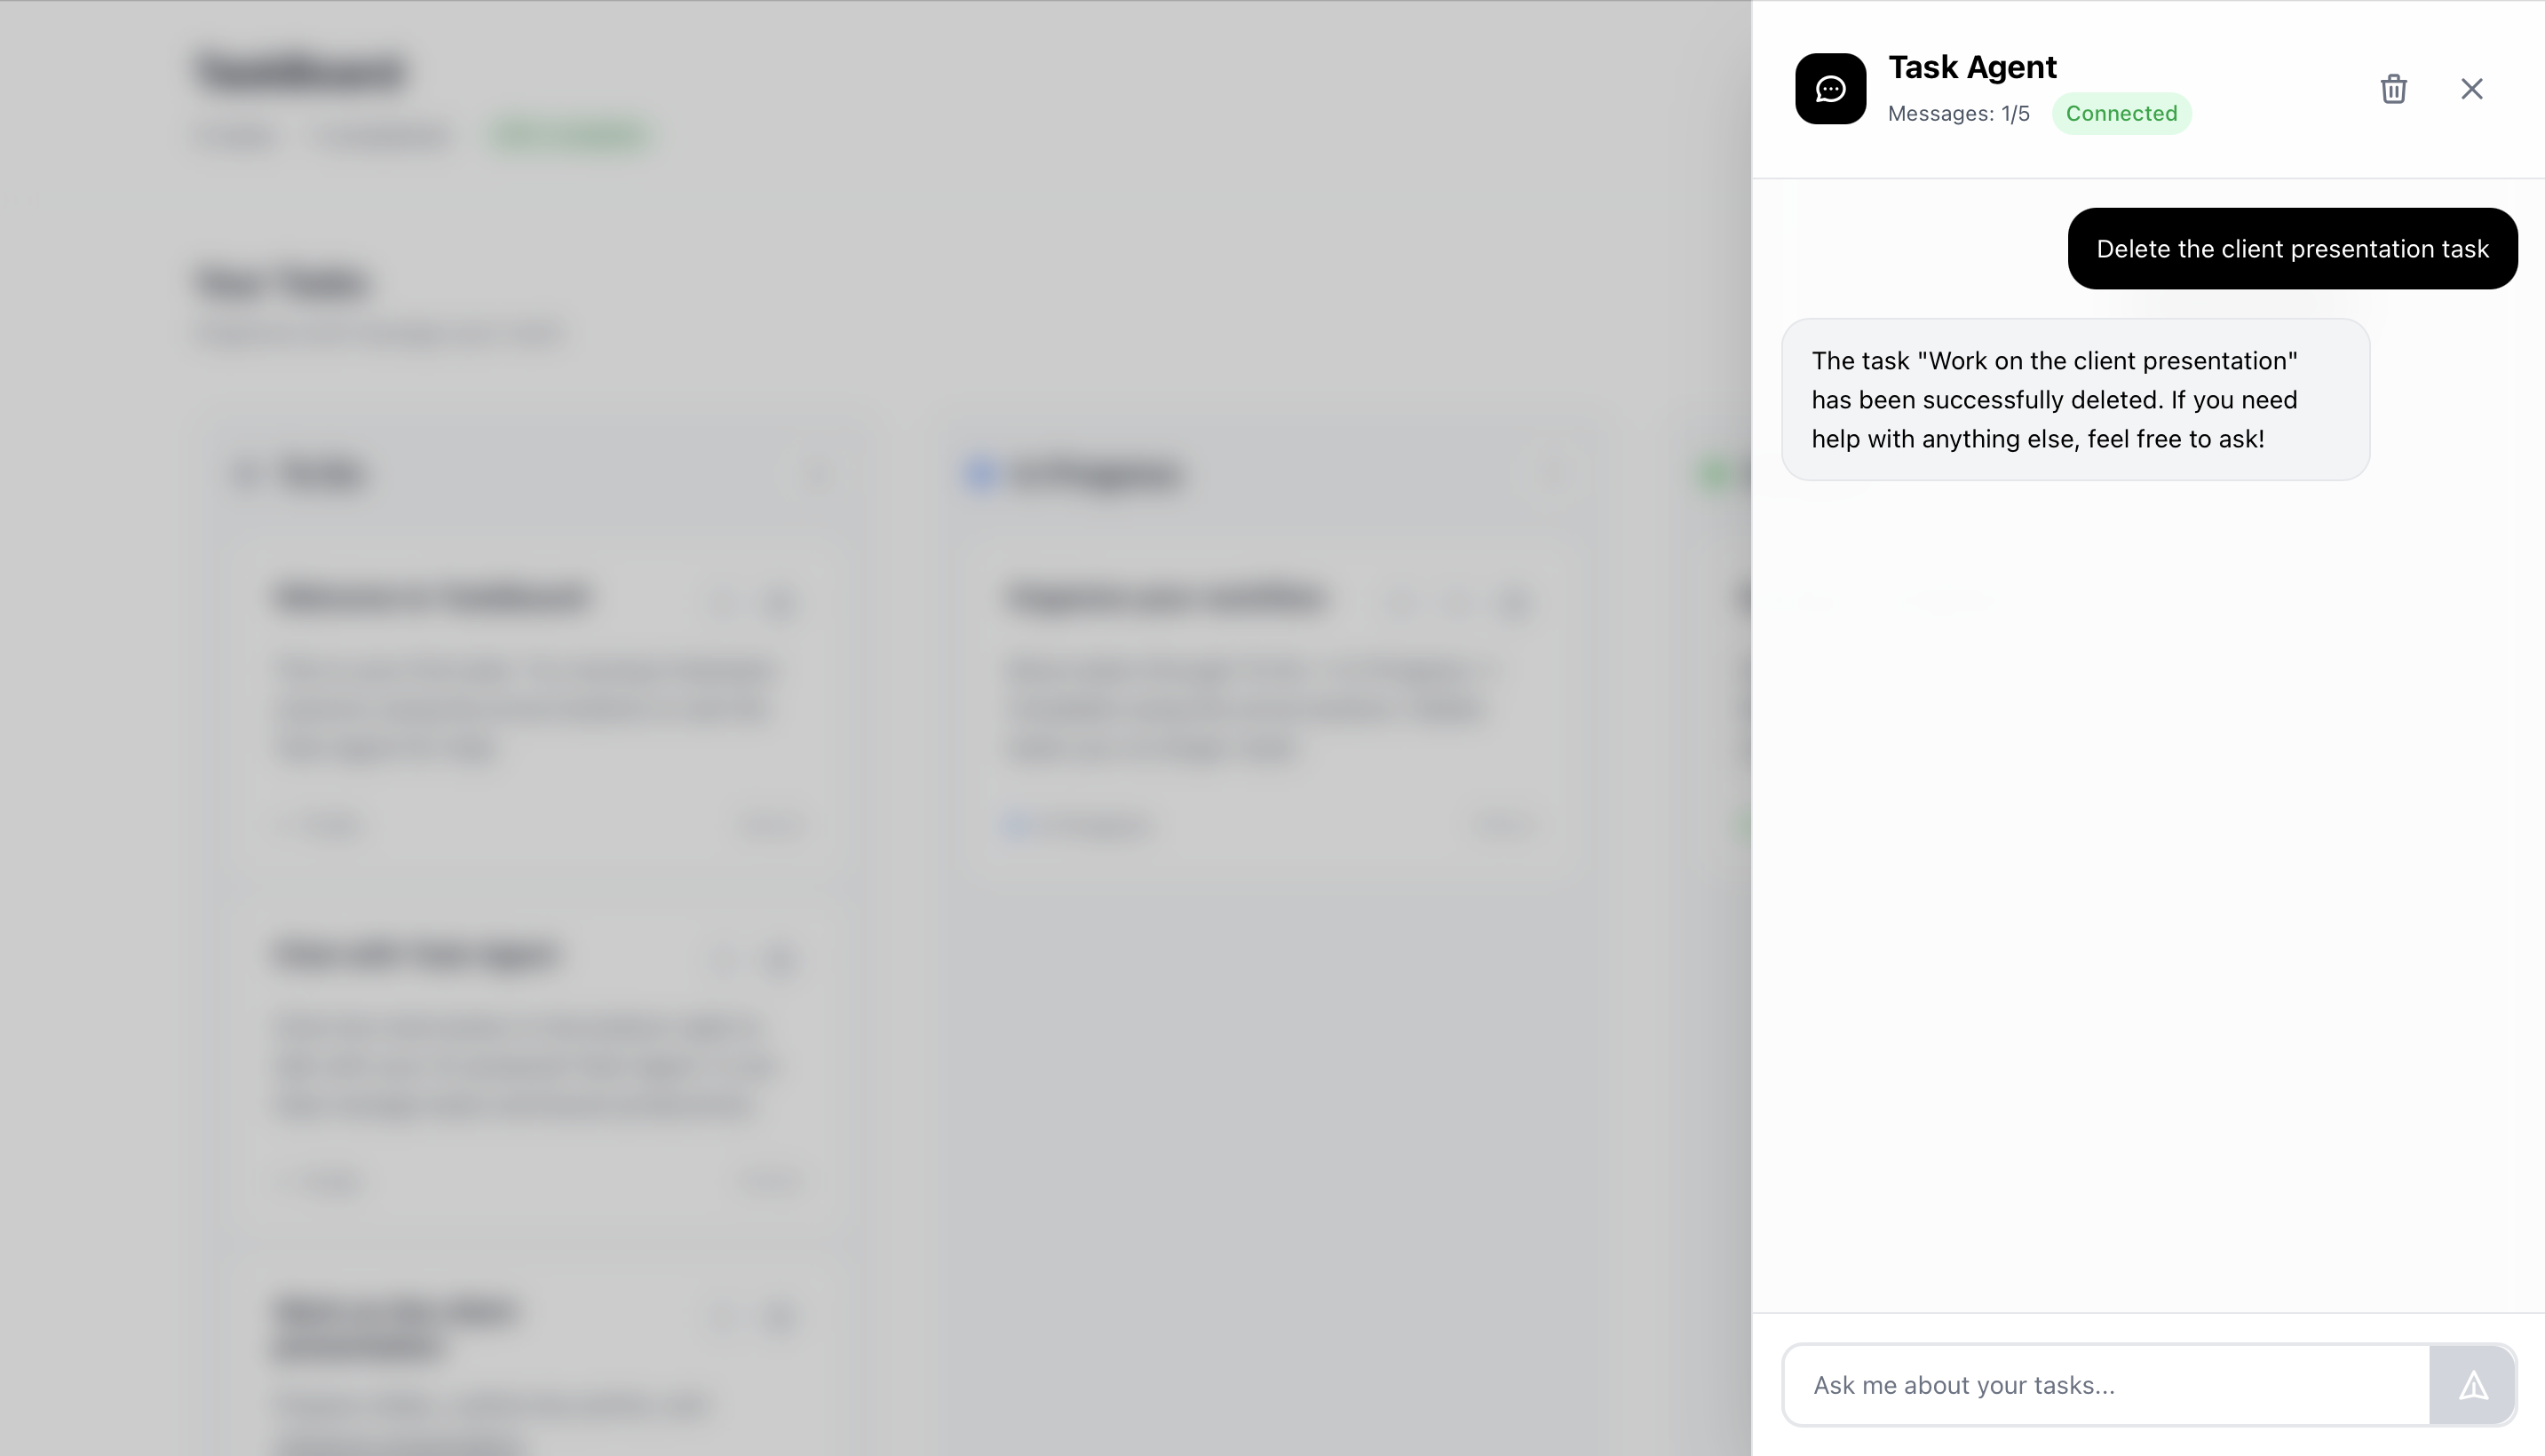
Section titled “Overview of the TaskBoard project with added chat”We’ll add a small chat microservice and popup chat component to the existing app:
TaskBoard/├── taskboard/ # Existing Next.js app (unchanged)│ ├── src/│ │ ├── app/api/│ │ │ ├── items/│ │ │ ├── chat/ # New: proxy to chat service│ │ │ ├── login/│ │ │ └── register/│ │ ├── components/│ │ │ ├── KanbanBoard/│ │ │ └── ChatComponent/ # New: floating chat popup│ │ └── lib/├── mcp-agent-service/ # New: small chat microservice│ ├── main.py # FastAPI + OpenAI Agents SDK│ ├── requirements.txt # 6 dependencies│ └── Dockerfile # Python container└── docker-compose.yml # Updated: runs both servicesHere’s the app interface with the chat component added:
Understanding the data flow of a chat-based task board
Section titled “Understanding the data flow of a chat-based task board”For the chat service, we’ll use the OpenAI Agents SDK to connect to the existing TaskBoard API. Here’s the complete flow:
- User types “Show me overdue tasks.”
- Chat popup sends request to Next.js backend, which forwards it to the chat service.
- OpenAI Agents SDK calls the
/api/itemsendpoint. - Response flows back with results formatted as natural language.
- TaskBoard UI updates to show the filtered results.
The existing app doesn’t change: Same database, authentication, and business logic. We’re just adding a new component to what is already built.
Traditional vs chat-enabled workflows
Section titled “Traditional vs chat-enabled workflows”Before the chat functionality is added, users only interact with the app manually:
- User clicks “Add Task” → TaskBoard UI → POST
/api/items→ database → UI updates - User drags task to “Done” → TaskBoard UI → PATCH
/api/items→ database → UI updates
After users have the option to use the chat popup:
- User types “Create a task for the client meeting tomorrow”
- Chat UI →
/api/chat→ FastAPI chat service →mcp-agent - Gram MCP server → POST
/api/items→ database - Success response → chat service → chat UI shows ”✅ Task created”
- TaskBoard UI automatically refreshes and shows the new task
Note that the existing /api/items endpoints don’t change at all. The chat functionality just adds a way to call the same APIs the UI already uses, with an LLM interpreting the user’s intent.
The complete chat-enabled architecture looks like this:
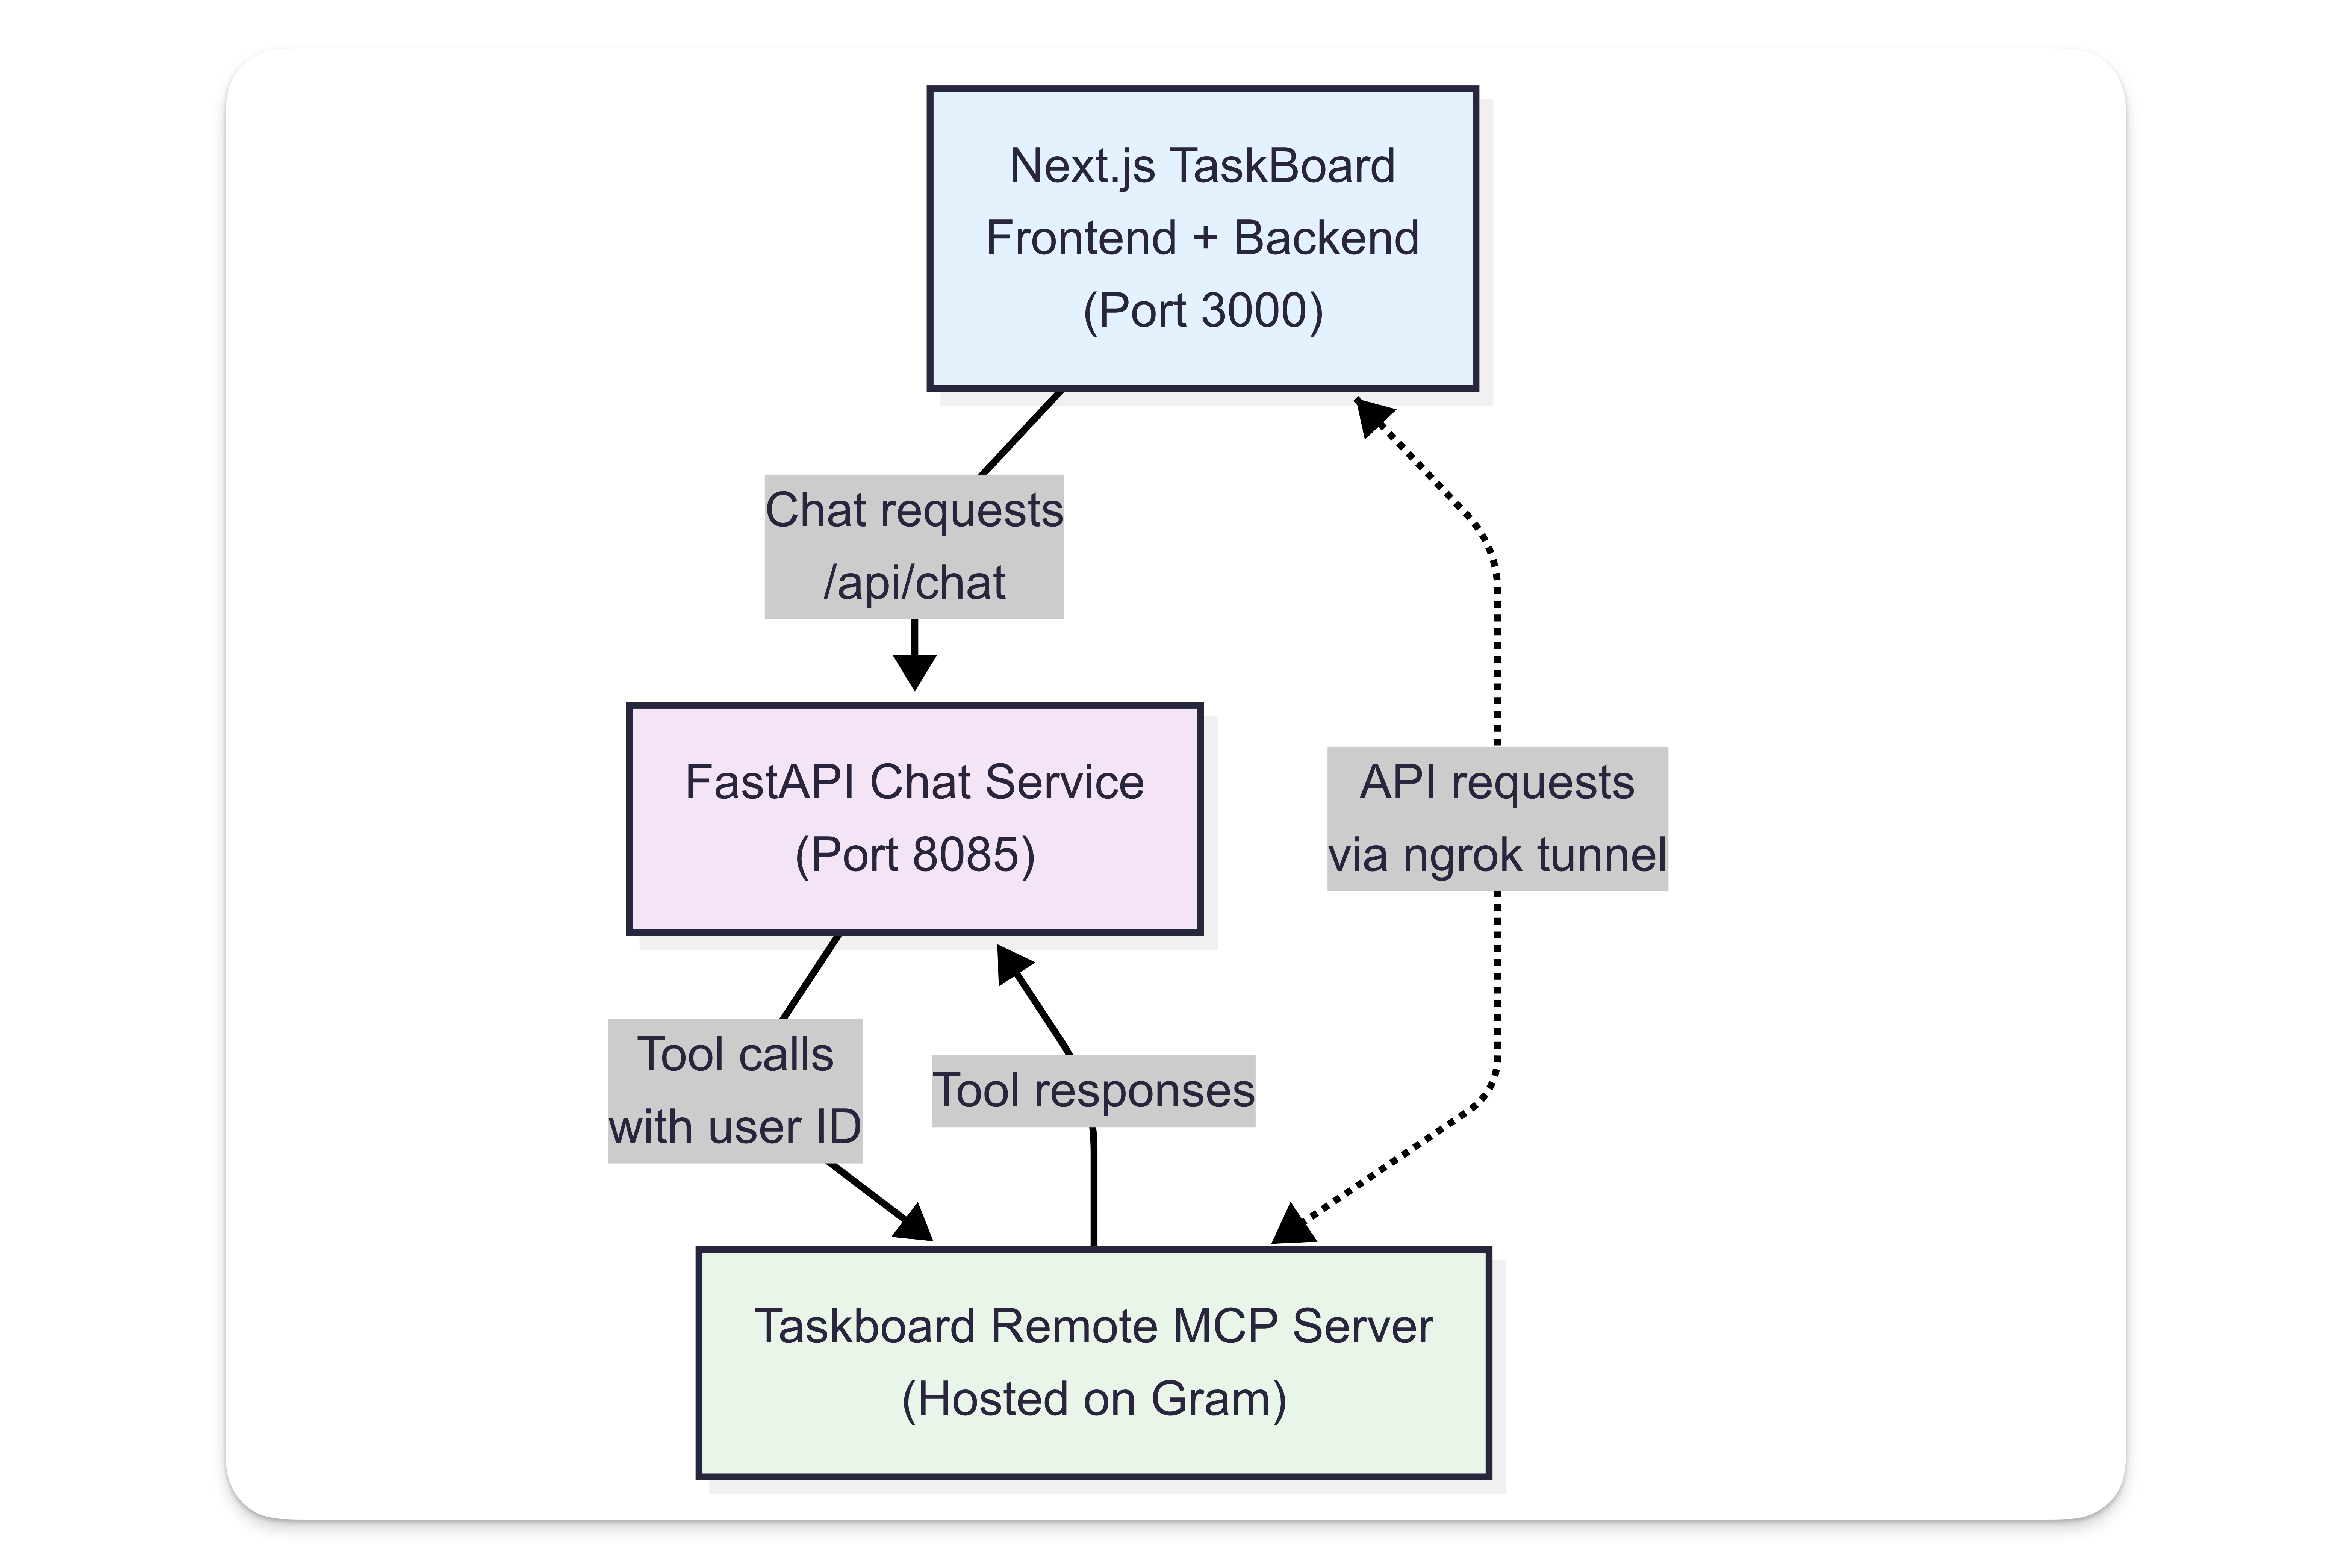
Using the Model Context Protocol (MCP), Gram converts the TaskBoard API endpoints into tools the agent can use.
Prerequisites
Section titled “Prerequisites”- A Gram account (free)
- An OpenAI API key from the OpenAI dashboard
- Node.js and Docker for local development
Clone and run the starter app
Section titled “Clone and run the starter app”First, get the basic CRUD app without chat functionality running. TaskBoard is already dockerized for easy setup.
git clone https://github.com/ritza-co/TaskBoard.gitcd TaskBoard
# Make sure you're on the main branch (CRUD only, no chat)git checkout main
# Create environment filecp .env.example .env
# Start with Docker (recommended for testing)docker-compose up --build
Visit http://localhost:3000, register an account, and create a few tasks. Click the arrows to move tasks between columns. This is the starting point: A working task management app that users interact with manually.
Step 1: Create an MCP server
Section titled “Step 1: Create an MCP server”The MCP server exposes the TaskBoard API operations as tools that AI agents can use.
To create the server, you need to generate an OpenAPI document and upload it to Gram. Gram will use the OpenAPI document to convert the API endpoints into MCP tools and host them as an MCP server. The OpenAI Agents SDK can connect to this server and use the tools to interact with the TaskBoard API.
Generate the OpenAPI document
Section titled “Generate the OpenAPI document”The TaskBoard app includes a script to generate an OpenAPI document from the JSDoc comments.
Generate the OpenAPI document with the following commands:
# In the taskboard directorynpm installnpm run generate-docsThis creates the complete API specification, including authentication requirements and data schemas, at public/swagger.json.
The existing JSDoc comments in the API routes (like /api/items/route.ts) provide the structure Gram needs to understand the TaskBoard endpoints.
Upload the OpenAPI document to Gram
Section titled “Upload the OpenAPI document to Gram”Gram automatically transforms the uploaded OpenAPI document into a hosted MCP server.
If you’re using Gram for the first time:
- In the Gram dashboard, click Toolsets in the sidebar (under CREATE).
- Click Get Started.
- Upload the OpenAPI document (
public/swagger.json). - Name the API (for example, “TaskBoard”), toolset, and server slug (for example, “taskboard-demo”).
If you’re an existing Gram user:
- Go to Toolsets in the sidebar.
- In the API Sources section, click + ADD API.
- Upload the OpenAPI document (
public/swagger.json). - Name the API (for example, “TaskBoard”).
- Click Continue.
- In the Toolsets section of the Toolsets tab, click + ADD TOOLSET.
- In the “Create a toolset” modal, give the toolset a name (for example, “TaskBoard”).
- Click Enable All on the TaskBoard toolset page.
Gram parses the uploaded OpenAPI document and converts the endpoints into MCP tools.
In the MCP tab, find the MCP server and set it to Public under Visibility.
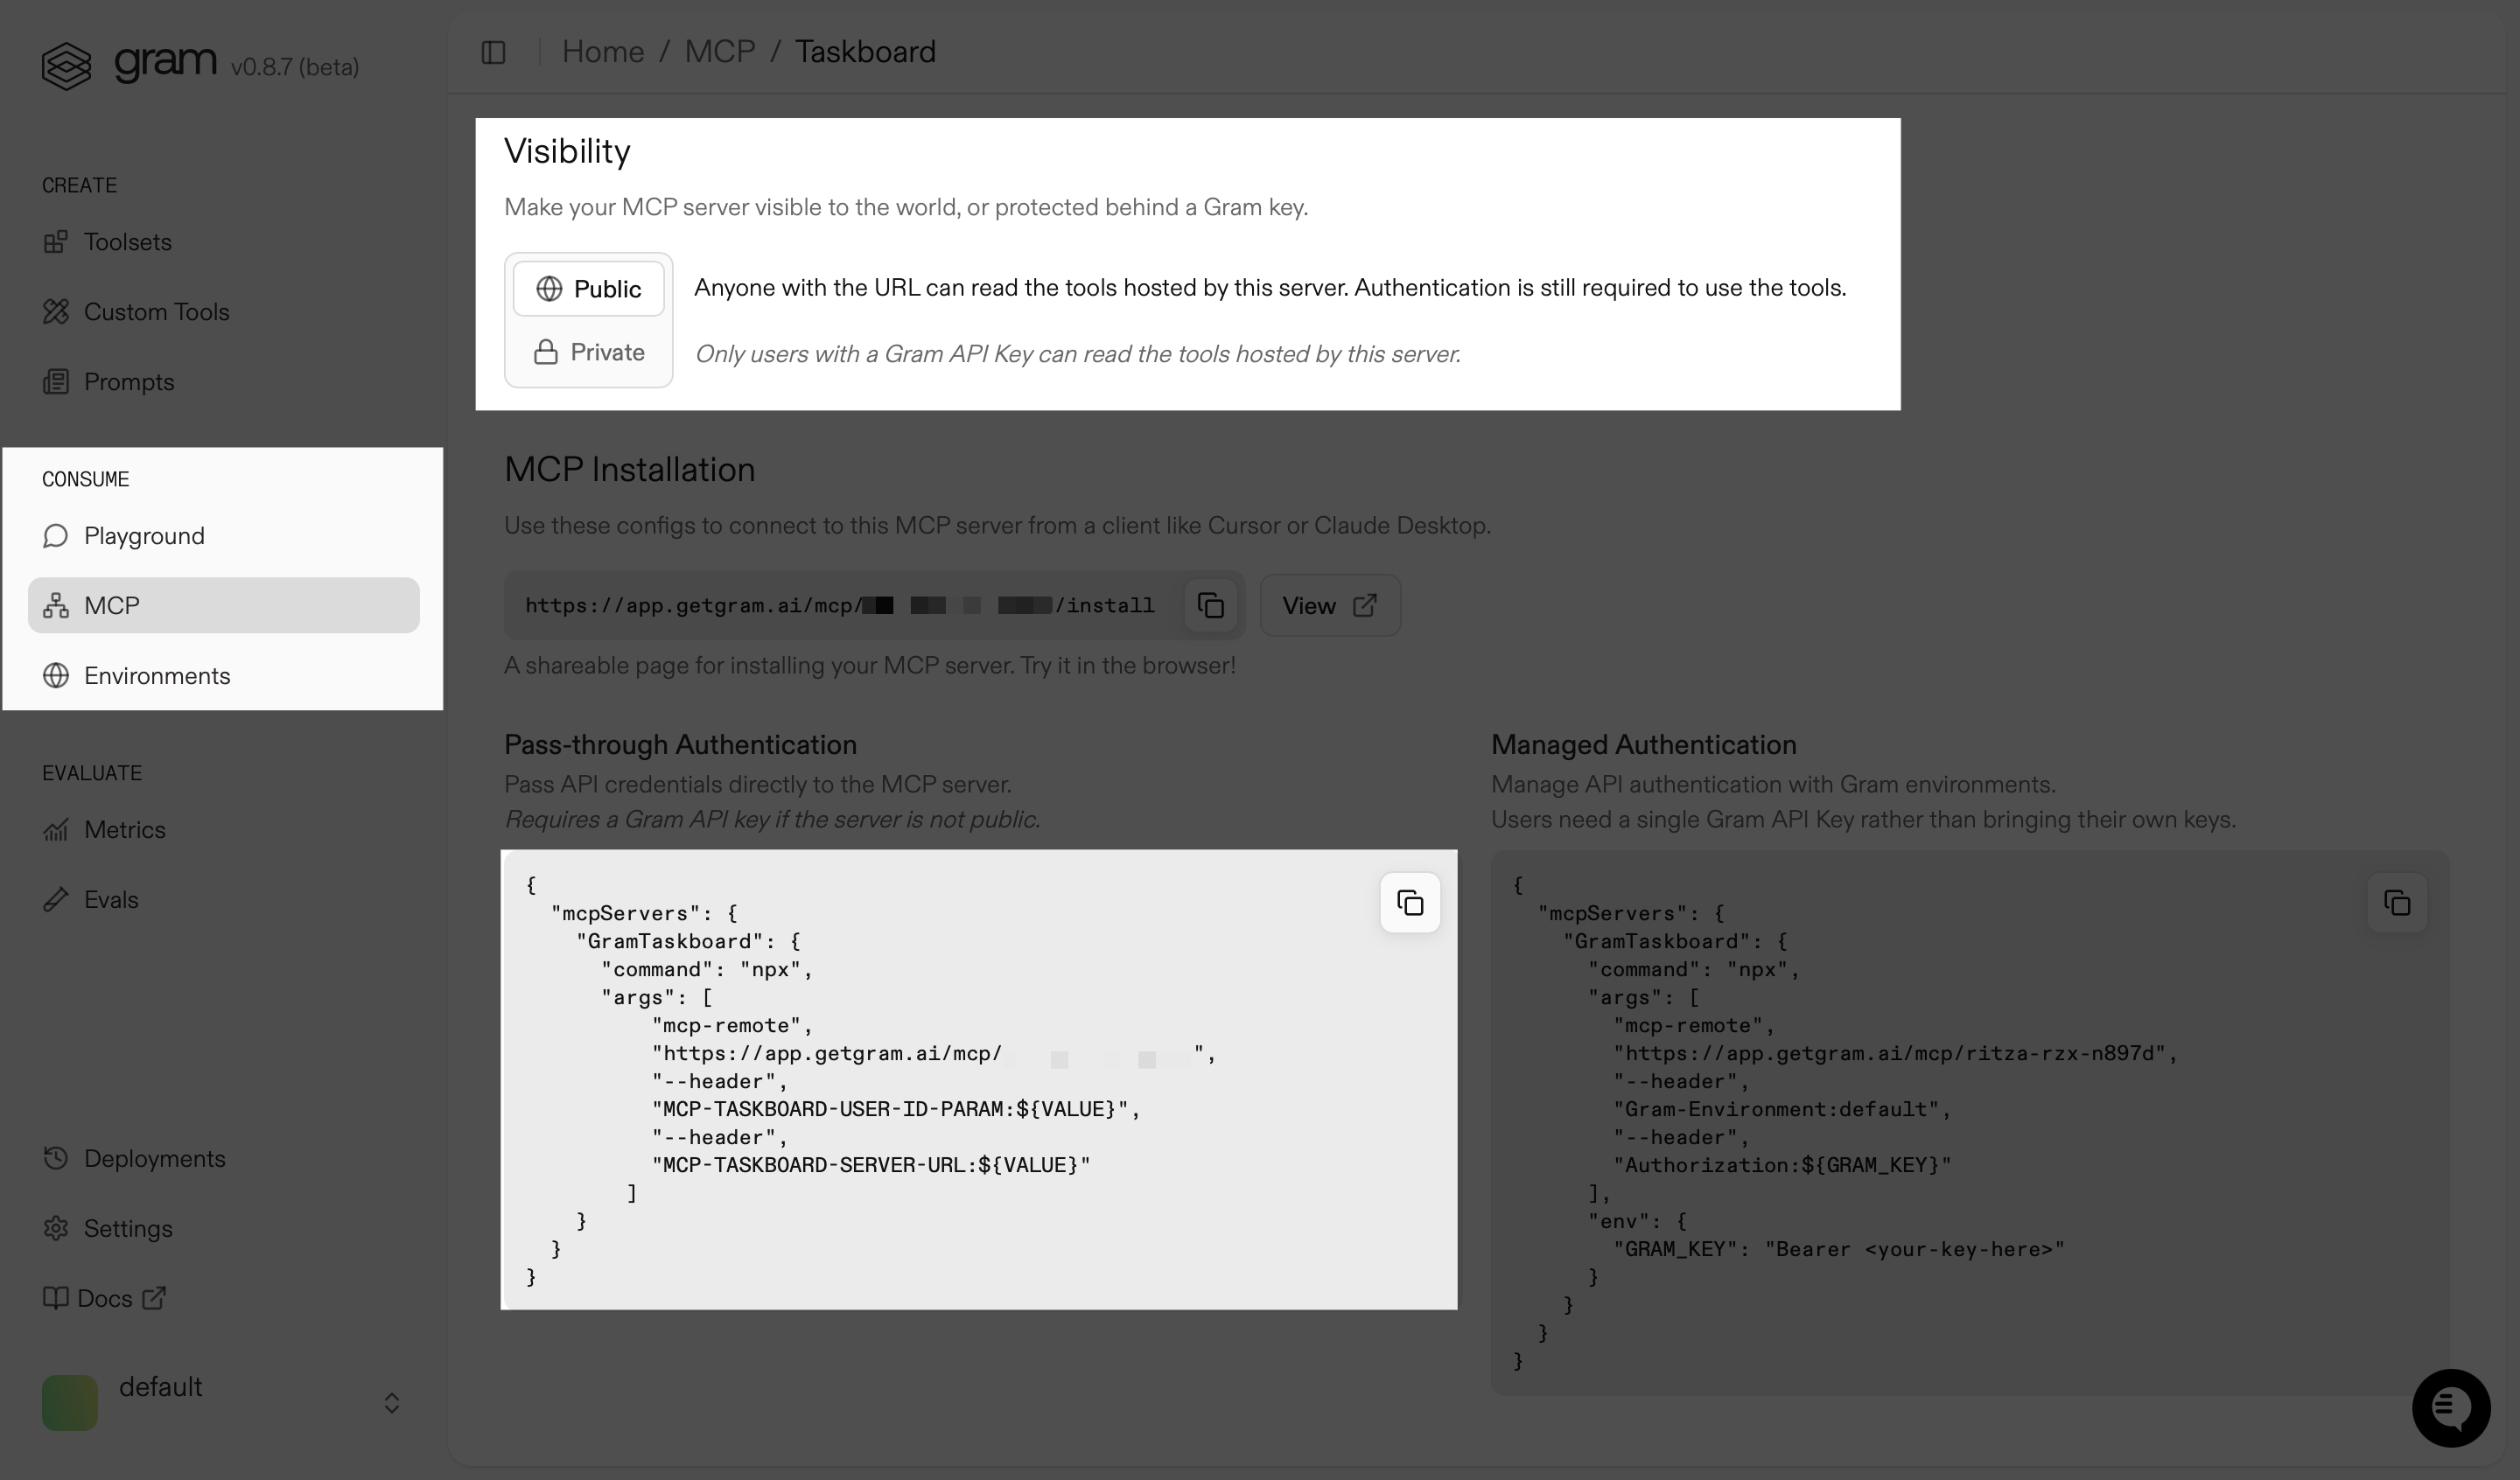
In the MCP Installation section, copy the server URL from the "args" array (for example, https://app.getgram.ai/mcp/your-server-id). You’ll use this when you configure the chat microservice in Step 3.
Expose your local API with ngrok
Section titled “Expose your local API with ngrok”For local development, expose the TaskBoard API so Gram can access it:
# Install ngrok if you haven't alreadybrew install ngrok # or download from ngrok.com
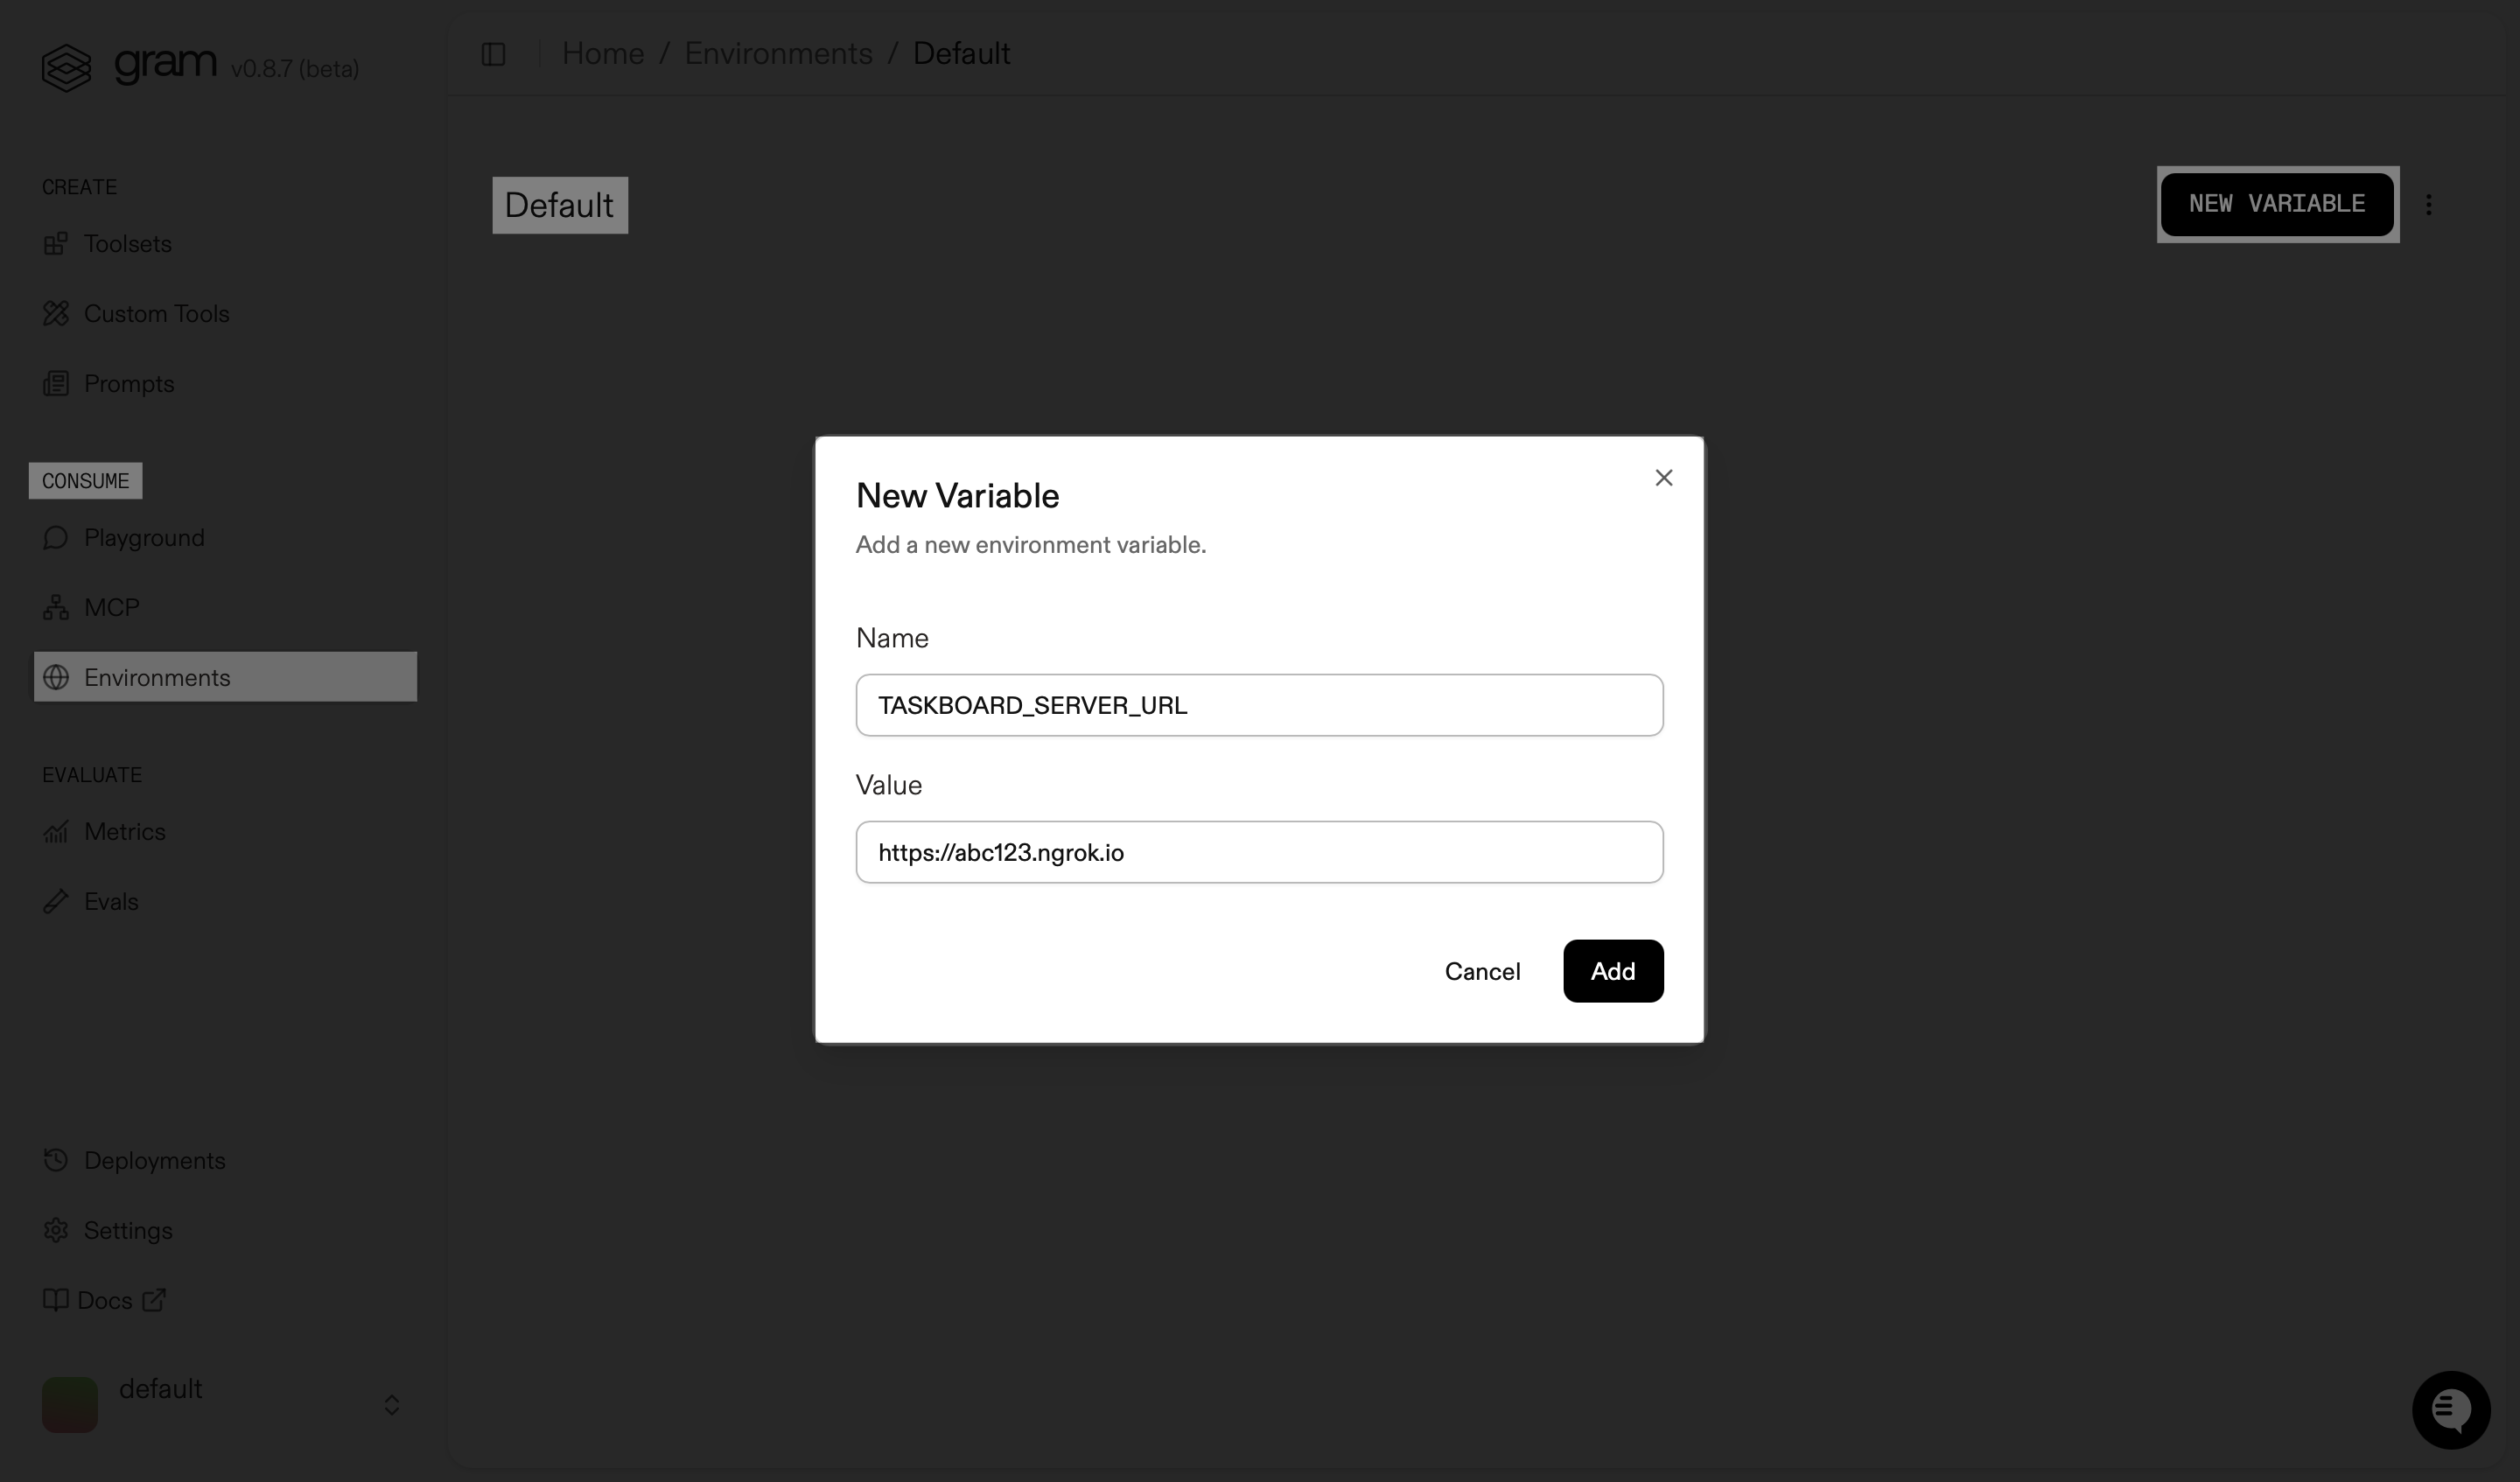
# In a new terminal, expose your local APIngrok http 3000Copy the public URL from the ngrok terminal output (such as https://abc123.ngrok.io).
In Gram, go to Environments from the sidebar, and select the Default environment. Add the public URL you copied as a TASKBOARD_SERVER_URL environment variable.
Test the MCP server
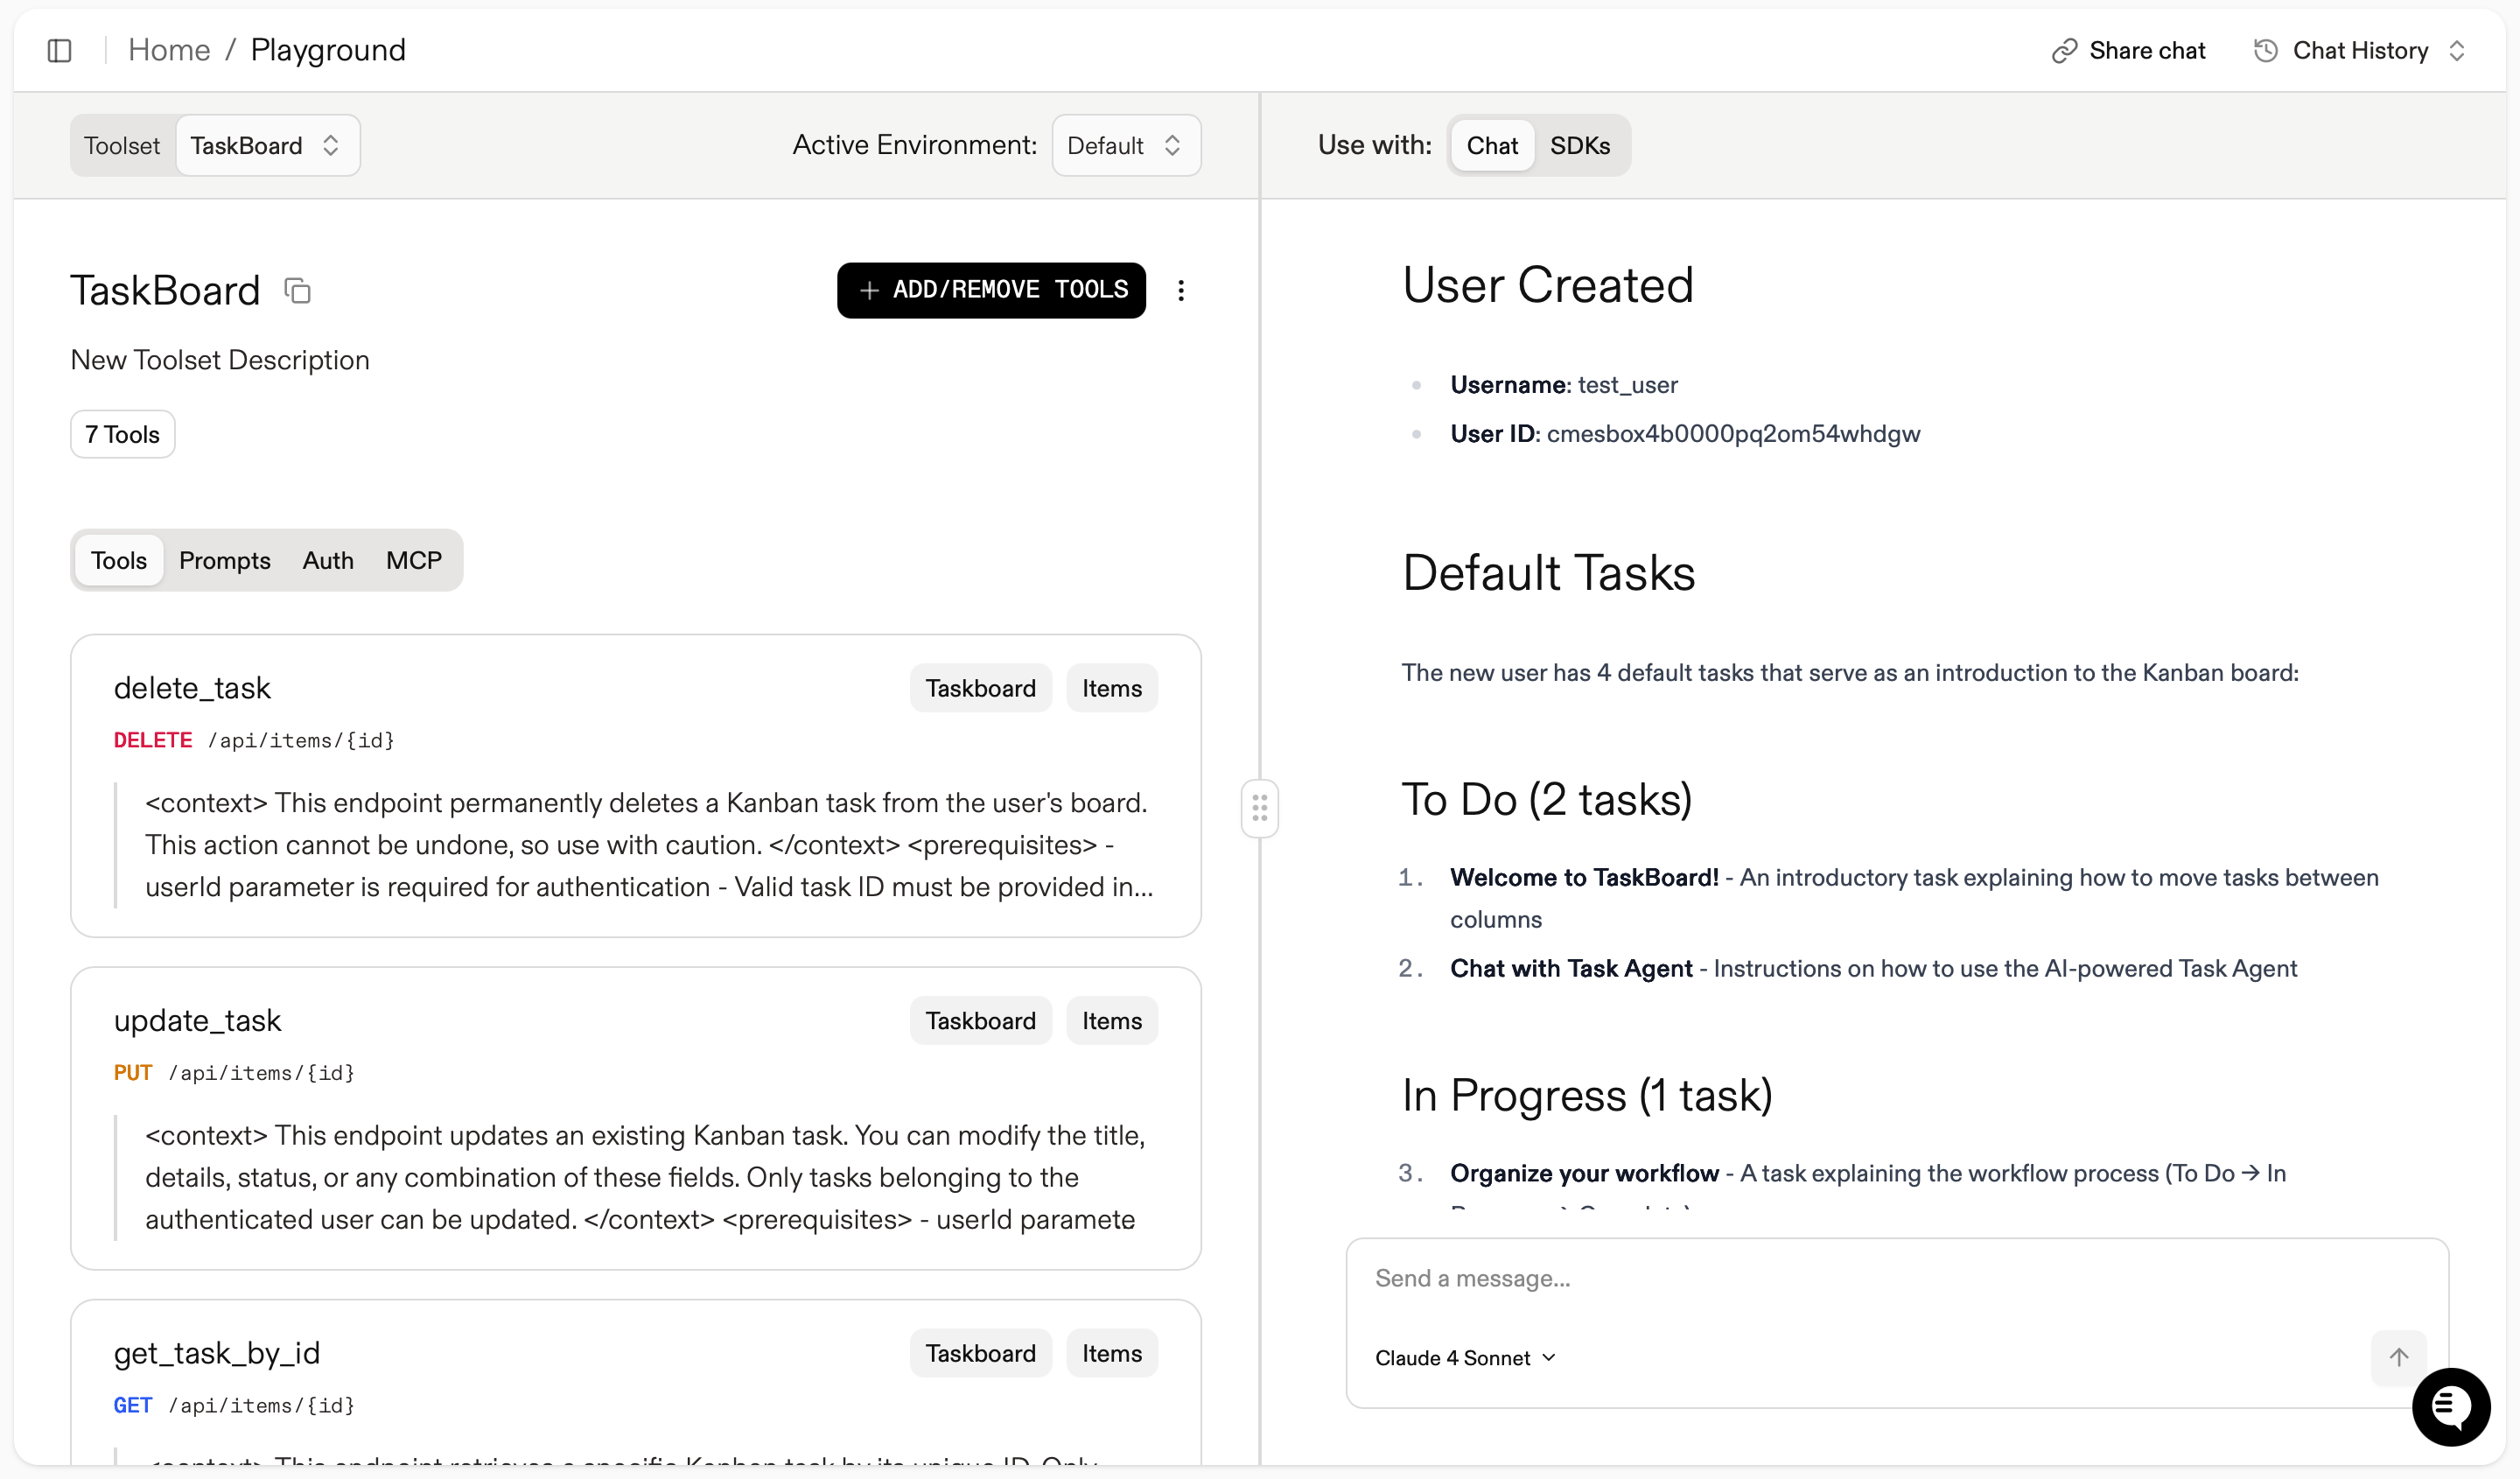
Section titled “Test the MCP server”To verify that the MCP server has been configured correctly, navigate to the Playground from the sidebar (under CONSUME) and select the TaskBoard toolset.
Try queries like “Show me all my tasks” or “Create a task called ‘Review quarterly reports.’”
Step 2: Add a chat popup to the frontend
Section titled “Step 2: Add a chat popup to the frontend”Next, you’ll add a floating chat interface to the TaskBoard app that won’t interfere with existing functionality.
The chat component will appear as a floating button in the lower-right corner of the screen. When clicked, the button expands into a chat window.
Create the chat component in the frontend
Section titled “Create the chat component in the frontend”Start with the basic structure and interfaces:
import React, { useState, useRef, useEffect } from 'react';import ReactMarkdown from 'react-markdown';import remarkGfm from 'remark-gfm';
interface Message {  role: 'user' | 'assistant';  content: string;  timestamp: string;  toolUsage?: any;  isStreaming?: boolean;}
interface ChatComponentProps {  userId: string;  onChatClose?: () => void;}
const ChatComponent: React.FC<ChatComponentProps> = ({ userId, onChatClose }) => {  const [messages, setMessages] = useState<Message[]>([]);  const [input, setInput] = useState('');  const [isLoading, setIsLoading] = useState(false);  const [sessionId, setSessionId] = useState<string | null>(null);  const [isOpen, setIsOpen] = useState(false);  const messagesEndRef = useRef<HTMLDivElement>(null);  const textareaRef = useRef<HTMLTextAreaElement>(null);
  const MAX_MESSAGES = 5;  const userMessageCount = messages.filter(msg => msg.role === 'user').length;
  // Core chat functionality - sendMessage, handleKeyDown, etc.  const sendMessage = async () => {    if (!input.trim() || isLoading) return;
    // ... message handling logic    try {      const response = await fetch(`/api/chat?userId=${encodeURIComponent(userId)}`, {        method: 'POST',        headers: { 'Content-Type': 'application/json' },        body: JSON.stringify({          message: userMessage.content,          conversation_history: messages.map(msg => ({            role: msg.role,            content: msg.content,            timestamp: msg.timestamp,          })),          session_id: sessionId,        }),      });      // ... response processing with streaming animation    } catch (error) {      // ... error handling    }  };
  return (    <>      {/* Floating Chat Button */}      {!isOpen && (        <button          onClick={() => setIsOpen(true)}          className="fixed bottom-4 right-4 z-50 w-14 h-14 bg-black text-white rounded-2xl shadow-2xl hover:shadow-xl transition-all duration-300 flex items-center justify-center"          aria-label="Open Task Agent"        >          {/* Chat icon SVG */}          <svg className="w-8 h-8" fill="none" stroke="currentColor" viewBox="0 0 24 24">            <path strokeLinecap="round" strokeLinejoin="round" strokeWidth={2} d="M8 12h.01M12 12h.01M16 12h.01M21 12c0 4.418-4.03 8-9 8a9.863 9.863 0 01-4.255-.949L3 20l1.395-3.72C3.512 15.042 3 13.574 3 12c0-4.418 4.03-8 9-8s9 3.582 9 8z" />          </svg>        </button>      )}
      {/* Chat Sidebar with responsive design, message rendering, and input area */}      {isOpen && (        <div className="fixed top-0 right-0 h-full z-50 w-full md:w-96 bg-white/95 backdrop-blur-lg border-l border-gray-200 shadow-2xl flex flex-col">          {/* Header with controls */}          <div className="flex-shrink-0 flex items-center justify-between p-4 border-b border-gray-200">            {/* ... header content */}          </div>
          {/* Messages area with tool usage indicators */}          <div className="flex-1 overflow-y-auto p-4 space-y-4">            {messages.map((message, index) => (              <div key={index} className={/* message styling */}>                {/* Tool usage display */}                {message.role === 'assistant' && message.toolUsage && (                  <div className="mb-3 p-3 rounded-lg border">                    {/* Tool indicators */}                  </div>                )}                {/* Message content with ReactMarkdown */}                <ReactMarkdown remarkPlugins={[remarkGfm]}>                  {message.content}                </ReactMarkdown>              </div>            ))}          </div>
          {/* Input area */}          <div className="flex-shrink-0 p-4 border-t border-gray-200">            {/* Textarea and send button */}          </div>        </div>      )}    </>  );};
export default ChatComponent;
The full code is in ChatComponent.tsx in the TaskBoard repo.
Add the chat component to the dashboard
Section titled “Add the chat component to the dashboard”Integrate the chat component into the main dashboard:
// Add this import at the topimport ChatComponent from '@/components/ChatComponent';
// Inside your dashboard component, add this after the TaskModal component at the end of the final return statement:{/* Floating Chat Component */}{userId && <ChatComponent userId={userId} onChatClose={() => fetchItems(true)} />}
Install the required dependencies
Section titled “Install the required dependencies”Install the chat component’s dependencies:
# In the /taskboard directorynpm install react-markdown remark-gfmStyle the component
Section titled “Style the component”The chat component uses custom CSS classes and animations that need to be defined in the global stylesheet.
The complete CSS for the component is in globals.css in the completed-ai-chat branch of the TaskBoard repo.
Add the CSS classes and animations for the chat component from the completed version’s globals.css to your local globals.css file.
Step 3: Create the chat microservice
Section titled “Step 3: Create the chat microservice”At this point, you should have a chat interface that looks functional but doesn’t connect to AI yet. The next step is to add the backend to make it work.
You’ll create a small FastAPI service (about 100 lines of code) that handles the AI processing using the OpenAI Agents SDK. Here’s how the service works:
- Receives chat messages from the TaskBoard frontend.
- Creates an AI agent that accesses the TaskBoard MCP tools via Gram.
- The agent decides which tools to use based on user intent.
- Returns natural language responses with the results.
The OpenAI Agents SDK handles understanding user intent, choosing which MCP tools to call to achieve the user’s intent, and generating responses based on the results of the MCP tools.
Set up the chat service
Section titled “Set up the chat service”Create the chat service directory:
# From the TaskBoard root directorymkdir mcp-agent-servicecd mcp-agent-serviceCreate the requirements file:
openai-agentsfastapi==0.116.1uvicorn==0.35.0python-dotenv==1.1.1pydantic==2.11.7httpx==0.28.1requests==2.32.4Create the main FastAPI service. Important: Replace https://app.getgram.ai/mcp/your-server-id on line 525 with your actual MCP server URL from Step 1.
import osimport uuidimport asynciofrom fastapi import FastAPIfrom fastapi.middleware.cors import CORSMiddlewarefrom pydantic import BaseModelfrom typing import List, Optional, Dict, Any# OpenAI Agents SDK - handles the AI agent logicfrom agents import Agent, Runner, SQLiteSessionfrom agents.mcp import MCPServerStdio  # Connects to Gram MCP server
app = FastAPI(title="OpenAI Agents Chat Microservice", version="1.0.0")
# Validate required environment variablesOPENAI_API_KEY = os.getenv("OPENAI_API_KEY")TASKBOARD_SERVER_URL = os.getenv("TASKBOARD_SERVER_URL")
if not TASKBOARD_SERVER_URL:    raise ValueError("TASKBOARD_SERVER_URL environment variable is required")
if not OPENAI_API_KEY:    raise ValueError("OPENAI_API_KEY environment variable is required")
# Set OpenAI API key for the libraryos.environ["OPENAI_API_KEY"] = OPENAI_API_KEY
# Add CORS middleware to allow requests from Next.js appapp.add_middleware(    CORSMiddleware,    allow_origins=["http://localhost:3000"],    allow_credentials=True,    allow_methods=["*"],    allow_headers=["*"],)
class ChatRequest(BaseModel):    message: str    conversation_history: List[Dict[str, Any]] = []    session_id: Optional[str] = None
class ChatResponse(BaseModel):    response: str    session_id: str    user_message_count: int    tool_usage: Optional[Dict[str, Any]] = None
def extract_user_id_from_history(conversation_history: List[Dict[str, Any]]) -> Optional[str]:    """Extract user ID from system message in conversation history."""    for msg in conversation_history:        if msg.get('role') == 'system' and msg.get('content'):            content = msg['content']            if 'User ID:' in content:                return content.split('User ID:')[1].split('.')[0].strip()    return None
async def create_mcp_server() -> MCPServerStdio:    """Create MCP server connection to Gram.
    This connects to your Gram MCP server, which acts as a bridge    between the OpenAI Agent and your TaskBoard API.    """    return MCPServerStdio(        name="GramTaskboard",        params={            "command": "npx",  # Uses the mcp-remote package            "args": [                "mcp-remote",                "https://app.getgram.ai/mcp/your-server-id",  # Replace with your actual Gram MCP server URL from Step 1                "--header",                f"MCP-TASKBOARD-SERVER-URL:{TASKBOARD_SERVER_URL}",  # Tells Gram where to find your API                "--timeout", "120000"            ]        },        cache_tools_list=True,  # Cache for performance        client_session_timeout_seconds=120.0,        max_retry_attempts=2,        retry_backoff_seconds_base=2.0    )
async def create_agent_with_mcp(user_id: str, mcp_server: MCPServerStdio) -> Agent:    """Create an OpenAI Agent that knows how to use your TaskBoard API.
    The Agent automatically discovers your API endpoints via the MCP server    and learns how to call them based on user requests.    """    return Agent(        name="TaskBoard Assistant",        instructions=f"""You are a helpful assistant that can manage tasks in a TaskBoard application.        You can list, create, update, delete, and search for tasks using the available MCP tools.
        When interacting with tasks:        - Always use the provided MCP tools to perform TaskBoard operations        - Be helpful and provide clear responses about task operations        - If a user wants to move a task, update its status (todo, doing, done)        - When listing tasks, organize them by status if helpful        - When creating tasks, ask for clarification if title or description is unclear
        {f'The user ID is: {user_id}. Always use this user ID when calling TaskBoard tools.' if user_id else 'User ID not available - tools may not work properly.'}
        Available task statuses: todo, doing, done
        Use natural language to explain what actions you're taking and their results.""",        model="gpt-4o-mini",  # The LLM that powers the agent        mcp_servers=[mcp_server]  # Your TaskBoard API tools    )
@app.post("/chat", response_model=ChatResponse)async def chat(request: ChatRequest):    # Generate session ID if not provided    session_id = request.session_id or str(uuid.uuid4())
    # Count user messages in conversation history    user_message_count = 1  # Current message    for msg in request.conversation_history:        if msg.get('role') == 'user':            user_message_count += 1
    # Check if we've reached the limit (5 messages)    if user_message_count > 5:        return ChatResponse(            response="This conversation has reached the maximum limit of 5 user messages. Please start a new conversation.",            session_id=session_id,            user_message_count=user_message_count        )
    # Extract userId from conversation history    user_id = extract_user_id_from_history(request.conversation_history)
    try:        # Create MCP server connection        mcp_server = await create_mcp_server()
        # Use the MCP server with timeout        async with asyncio.timeout(180):  # 3 minute total timeout            async with mcp_server as server:                # Create agent with the connected MCP server                agent = await create_agent_with_mcp(user_id, server)
                # Create session for conversation persistence                session = SQLiteSession(session_id, "conversations.db")
                # Run the agent                result = await Runner.run(                    agent,                    request.message,                    session=session                )
                # Extract tool usage information                tool_usage = None                if hasattr(result, 'tool_calls') and result.tool_calls:                    tool_usage = {                        "has_tools": True,                        "tool_calls": [                            {                                "function": {                                    "name": tc.get('name', 'unknown'),                                    "arguments": tc.get('arguments', {})                                },                                "content": tc.get('result', 'No result')                            } for tc in result.tool_calls                        ]                    }
                return ChatResponse(                    response=result.final_output,                    session_id=session_id,                    user_message_count=user_message_count,                    tool_usage=tool_usage                )
    except asyncio.TimeoutError:        return ChatResponse(            response="The TaskBoard service is taking too long to respond. Please try again in a few minutes.",            session_id=session_id,            user_message_count=user_message_count        )    except Exception as e:        print(f"Error in chat endpoint: {e}")        return ChatResponse(            response="I'm experiencing technical difficulties. Please try again in a moment.",            session_id=session_id,            user_message_count=user_message_count        )
@app.get("/health")async def health_check():    return {"status": "healthy", "service": "openai-agents-chat-microservice"}
if __name__ == "__main__":    import uvicorn    uvicorn.run(app, host="0.0.0.0", port=8085)
How the agent works
Section titled “How the agent works”Here’s how the OpenAI Agents SDK automates the workflow:
- Tool discovery: The SDK connects the agent to the MCP server to access the available TaskBoard tools (like
get_itemsandcreate_item). - Action planning: When a user says “show overdue tasks,” the agent decides which MCP tools to call.
- Execution: The agent calls the appropriate MCP tools, which in turn call the
/api/itemsendpoint. - Response formatting: The agent converts the raw JSON response into natural language.
You don’t need to engineer prompts, write tool calling logic, or format responses. The SDK handles it all.
Set up environment variables
Section titled “Set up environment variables”In the mcp-agent-service directory, create a .env file with your OpenAI API key and ngrok URL. In the following command, replace your_openai_api_key_here and https://your-ngrok-url.ngrok.io with your actual values:
OPENAI_API_KEY=your_openai_api_key_hereTASKBOARD_SERVER_URL=https://your-ngrok-url.ngrok.io # Your ngrok URL from Step 1Step 4: Connect the frontend to the chat service
Section titled “Step 4: Connect the frontend to the chat service”Now let’s create the API route that connects the chat frontend to the chat service, ensuring user authentication is preserved.
Add the chat API route
Section titled “Add the chat API route”Create the chat API endpoint in the Next.js app:
import { NextRequest, NextResponse } from 'next/server';
const CHAT_SERVICE_URL = process.env.CHAT_SERVICE_URL || 'http://localhost:8085';
export async function POST(request: NextRequest) {  // Get userId from URL parameter (handled by middleware)  let userId = request.headers.get('x-user-id');
  if (!userId) {    userId = new URL(request.url).searchParams.get('userId');  }
  if (!userId) {    return NextResponse.json({ message: 'Unauthorized - userId required' }, { status: 401 });  }
  try {    const body = await request.json();
    // Prepare conversation history with user context    const conversationHistory = body.conversation_history || [];
    // Add system message with user ID for security    conversationHistory.unshift({      role: 'system',      content: `User ID: ${userId}. Always use this user ID when calling TaskBoard tools to ensure you access the correct user's data.`,      timestamp: new Date().toISOString()    });
    const requestBody = {      message: body.message,      conversation_history: conversationHistory,      session_id: body.session_id,    };
    // Forward to chat service    const chatResponse = await fetch(`${CHAT_SERVICE_URL}/chat`, {      method: 'POST',      headers: {        'Content-Type': 'application/json',      },      body: JSON.stringify(requestBody),    });
    if (!chatResponse.ok) {      throw new Error(`Chat service responded with status: ${chatResponse.status}`);    }
    const chatData = await chatResponse.json();    return NextResponse.json(chatData);
  } catch (error) {    console.error('Chat API error:', error);    return NextResponse.json(      { message: 'Failed to process chat request' },      { status: 500 }    );  }}
Update the middleware
Section titled “Update the middleware”Update this section of middleware.ts in the demo code to include the new chat route:
// Update the config at the bottom of the file:export const config = { matcher: ['/api/items', '/api/items/:path*', '/api/chat'], // Add /api/chat};Set up Docker
Section titled “Set up Docker”Now set up Docker to run the TaskBoard app and the chat service together.
Create the Dockerfile inside the mcp-agent-service directory:
# mcp-agent-service/DockerfileFROM python:3.11-slim
# Install Node.js and npm for npx commandRUN apt-get update && apt-get install -y \    curl \    && curl -fsSL https://deb.nodesource.com/setup_20.x | bash - \    && apt-get install -y nodejs \    && rm -rf /var/lib/apt/lists/*
WORKDIR /appCOPY requirements.txt .RUN pip install -r requirements.txtCOPY . .
EXPOSE 8085CMD ["uvicorn", "main:app", "--host", "0.0.0.0", "--port", "8085"]
Update the docker-compose.yml file in the root TaskBoard directory to include both services:
version: '3.8'
services:  taskboard:    build: ./taskboard    ports:      - "3000:3000"    environment:      - CHAT_SERVICE_URL=http://chat-service:8085      - DATABASE_URL=${DATABASE_URL:-file:./prisma/dev.db}    depends_on:      - chat-service    volumes:      - ./taskboard/prisma/dev.db:/app/prisma/dev.db    networks:      - taskboard-network    env_file:      - .env
  chat-service:    build: ./mcp-agent-service    ports:      - "8085:8085"    environment:      - PYTHONUNBUFFERED=1      - OPENAI_API_KEY=${OPENAI_API_KEY}      - TASKBOARD_SERVER_URL=${TASKBOARD_SERVER_URL:-http://taskboard:3000}    networks:      - taskboard-network    env_file:      - .env
networks:  taskboard-network:    driver: bridge
Set up environment variables for Docker
Section titled “Set up environment variables for Docker”Update the .env file in the root TaskBoard directory (same level as docker-compose.yml), replacing the placeholder values with your actual API key and ngrok URL:
# .env (in root TaskBoard directory)DATABASE_URL="file:./prisma/dev.db" # Already presentOPENAI_API_KEY=your_openai_api_key_here # Add your OpenAI API key hereTASKBOARD_SERVER_URL=https://your-ngrok-url.ngrok.io # Your ngrok URL from Step 1Start both services from the root TaskBoard directory (where docker-compose.yml is located):
# From the root TaskBoard directorydocker-compose up --buildTest the complete integration
Section titled “Test the complete integration”Visit http://localhost:3000, log in, and click the chat button. Try these test queries:
- Show me all my tasks- Create a task called 'Test the chat feature'- Move the chat feature task to doingYou should see:
- Chat responses in the chat window
- Automatic TaskBoard updates when the agent performs actions
- Only your tasks are visible and editable (user permissions respected)
Troubleshooting
Section titled “Troubleshooting”Chat not responding
Section titled “Chat not responding”- Check that both services are running (
localhost:3000andlocalhost:8085). - Verify that your OpenAI API key is valid.
- Look for errors in both terminal windows.
AI can’t access your tasks
Section titled “AI can’t access your tasks”- Confirm ngrok is running and you’ve updated the
TASKBOARD_SERVER_URLin Gram. - Test the MCP server in the Gram Playground first.
- Check that the user is properly authenticated in TaskBoard.
Permission errors
Section titled “Permission errors”- Make sure the
userIdis being passed correctly through the chat flow. - Verify that the API middleware is working:
curl "http://localhost:3000/api/items?userId=test".